
Data Link overview
Data Link inserts live, engagement-based content into documents, so you don't type and update values manually. Data links retrieve information that exists in the engagement or in Caseware Cloud and insert it into text, so the value updates as engagement data changes.
Use Data Link when you want a document to display current engagement information automatically. This helps in financial statements, letters, memos, checklists, query questions and guidance text.
A few things to know about how Data Link works:
-
It inserts linked content backed by a formula, not plain text, so the displayed value updates as engagement data changes
-
It works with more than financial numbers — you can also insert glossary terms, dates and other engagement-driven values
-
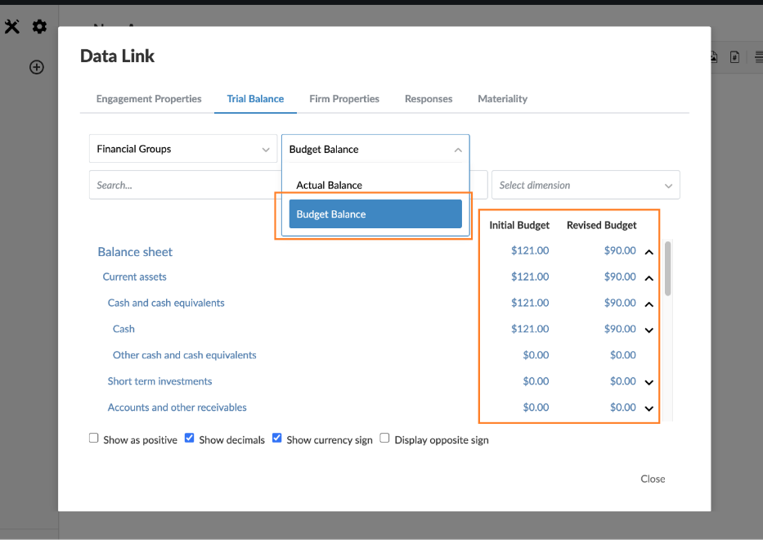
It supports budget values where budget balances are available, including Initial Budget and Revised Budget
-
You don't need to know formula syntax — Data Link builds the link through selections in the interface
Types of data links you can insert
You can group data links by source. Caseware Cloud supplies firm and engagement properties; the engagement supplies financial and document data. Each type appears as a tab.
You can insert these data links:
| Data link | Source | Inserts |
|---|---|---|
| Engagement properties | Caseware Cloud | Properties defined in Caseware Cloud, such as entity names, dates and currency. See the full list below |
| Trial balance | Engagement | Trial balance items such as account name, grouping name, or current and prior year values |
| Firm properties | Caseware Cloud | Firm name and firm address |
| Responses | Engagement | Responses to checklist procedures |
| Materiality | Engagement | Defined values from the Materiality document |
Authors can insert these data links from the product template:
| Data link | Source | Inserts |
|---|---|---|
| Engagement glossary | Engagement | A glossary term, for consistent wording across documents. The tab appears only after Caseware has defined glossary terms. |
| Dynamic text | Engagement | Conditional text that changes based on one or more conditions |
Engagement properties options
The following are examples of available data links:
-
Entity details – operating name, legal name, entity first name, entity middle name, entity last name, entity address
-
Year dates – current year start date, current year end date, prior year start date, prior year end date
-
Month and day – current start month and day, current end month and day, prior start month and day, prior end month and day
-
Period month and day – current period start month and day, current period end month and day, prior period start month and day, prior period end month and day
-
Reporting dates – report release date, report signing date
-
Year and website – current year, prior year, website
-
Currency – currency code, currency name, currency symbol
Trial balance options
When you insert a trial balance item, you can refine the value returned:
-
Select an account name, grouping name, or a current or prior year value
-
From the balance drop-down menu, select Actual Balance or Budget Balance
-
Select a grouping structure from the Financial Groups drop-down menu
-
Where dimensions are enabled, select a dimension from the Select dimension drop-down menu
-
For consolidated engagements, choose parent or subsidiary data, and consolidated or non-consolidated values – or use the document default
-
Set the display options: Show as positive, Show decimals, Show currency sign, Display opposite sign
Budget balances
When the engagement has budget balances, select Budget Balance to show an Initial Budget and a Revised Budget column, then select the value you want. Note the following:
-
Budget balances apply to current-year balances
-
Budget balances are separate from planning balances
-
Budget balances work with grouping structures, dimensions and consolidation, the same as actual balances
From the Trial Balance tab with Budget Balance selected:
Responses
To insert a response:
Select the checklist document, then select the response you want.
Where you can add data links
You add data links wherever you edit text in a supported document. Common locations include:
-
Text sections and client requests
-
Text areas in a letter or memo
-
Text sections in the financial statements
-
Query questions
-
Procedure descriptions
-
Guidance sections in the firm template
Add a data link
To add a data link in a text section:
-
Open the document.
-
Select the text section you want to edit. The formatting toolbar appears.
-
Place the cursor where you want the value to appear.
-
On the formatting toolbar, click Insert Formula [
 ].
]. -
In the Data Link dialog, select the tab for the type of data link you want.
-
Select the item, value or balance you want.
-
Set any display options.
-
Select Close.
-
Click the check mark to save your changes.
From the document editor with a text section open for editing:
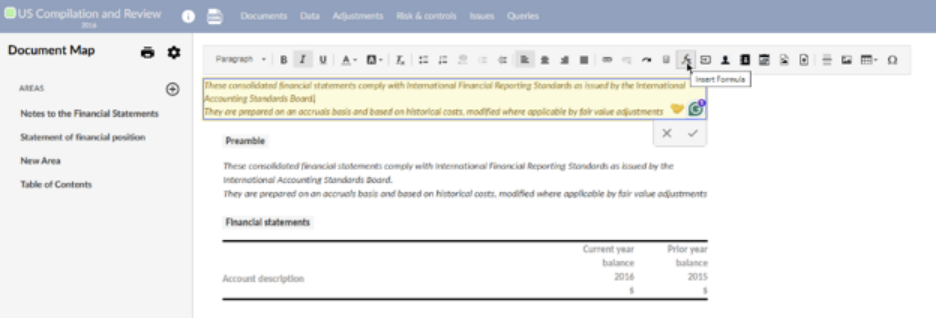
The value behaves as linked content, not plain text.
Add dynamic text
Dynamic text displays different text based on a condition or set of conditions.
To add dynamic text:
-
Open the document and select Edit.
-
Place the cursor where you want the text to appear.
-
On the formatting toolbar, click Insert Formula [
]. -
On the Dynamic Text tab, select the Add Condition drop-down menu.
-
Choose a condition type and complete its setup. The dialog shows different fields for each type, as described below.
-
To add another output, select Add Condition and repeat.
-
Optionally, enter alternate output text for when no conditions are met.
-
Select Save.
If a condition is met, its output text displays. If no condition is met, the alternate output text displays. Otherwise, #ValueEmpty# displays.
The following table describes the setup fields for each condition type:
| Condition type | Setup |
|---|---|
| Response | Document – the source document for the response. Procedure – the procedure the response applies to. Condition – the response value. Output – the text to display when the condition is met |
| Trial balance | Financial Group – the trial balance account or account group. Condition – how the income statement name displays based on net income: Consistent displays "Statement of Income", Contrary displays "Statement of Loss", Inconsistent displays "Statement of Income (Loss)". Output – the text to display when the condition is met |
| Consolidation | Condition – the consolidation situation, Consolidated or Non-consolidated. Output – the text to display when the condition is met |
| Scaling/Rounding | Condition – the rounding scale. Output – the text to display when the condition is met |
| Reporting period | Condition – the reporting period: Monthly, Quarterly, Semi-Annual or Annual. Output – the text to display when the condition is met |
| Organization type | Condition – a country. Output – the text to display when the condition is met |
| Group of conditions | Group Condition – select "When all conditions below are met" (all must be true) or "When any condition below is met" (any one must be true). Output – the text to display when the group condition is met |
Add a data link in a guidance section
Authors can add data links to guidance sections so guidance updates automatically with engagement data. For example, you can:
-
Show different instructions for different engagement types, such as review versus compilation
-
Insert trial balance values or materiality thresholds into guidance
-
Display glossary terms or authoritative references based on engagement context
-
Reference checklist responses to tailor guidance
To add a data link in a guidance section:
-
Confirm you have the Settings Admin role or similar. To learn more, see Built-in roles and Assign security roles.
-
From the Caseware Cloud menu, select Settings | your product | Manage Template.
-
Open the product template and select the Documents page.
-
Navigate to the document and guidance section you want to update.
-
Select the guidance text field.
-
Click Insert Formula [
]in the formatting toolbar. -
In the Data Link dialog, select the data link type.
-
Configure any conditions or fallback text.
-
Select Save.
Remove a data link
To remove a data link:
-
Highlight the data link in the text.
-
Press Delete or Backspace.
Best practices
We recommend the following practices:
-
Use linked values for information that may change. This reduces manual updates and inconsistencies.
-
Choose the correct balance type before you insert. Actual Balance, Initial Budget and Revised Budget can represent different reporting needs.
-
Review dimensions and consolidation context. Small selection changes can affect the value returned.
-
Use glossary terms for repeated wording. This improves consistency across documents.
-
Preview your result in context. After insertion, confirm the value reads correctly in the sentence or paragraph.