
Create a custom mapping file (.ini)
You can quickly and efficiently create custom accounts and risk mapping files for data transferred through CloudBridge to each of your cloud engagement apps.
Accounts mapping
-
Launch CloudBridge and connect to your Cloud server.
-
On the Upload Dashboard, click Generate Mapping | Accounts mapping.
-
In the Generate Accounts Mapping File dialog, select whether to generate a new engagement file, or to use an existing one. Complete the fields as required.
New:
-
AC File location: Click Browse and select the source Working Papers engagement for your mapping/grouping structure.
-
Select Cloud App: Select which Cloud app you are mapping to.
-
Select Cloud Entity: Select an entity on your Cloud server.
-
Select Mapping Structure: Select the applicable mapping/grouping structure from the source Working Papers engagement.
-
Cloud Engagement Name: Enter a name for the mapping file or use the default name provided.
Existing:
-
Select Cloud App: Select which Cloud app you are mapping to.
-
Select Cloud Entity: Select an entity on your Cloud server.
-
Select Cloud Engagement: Select the target Cloud engagement.
Click Next.
-
-
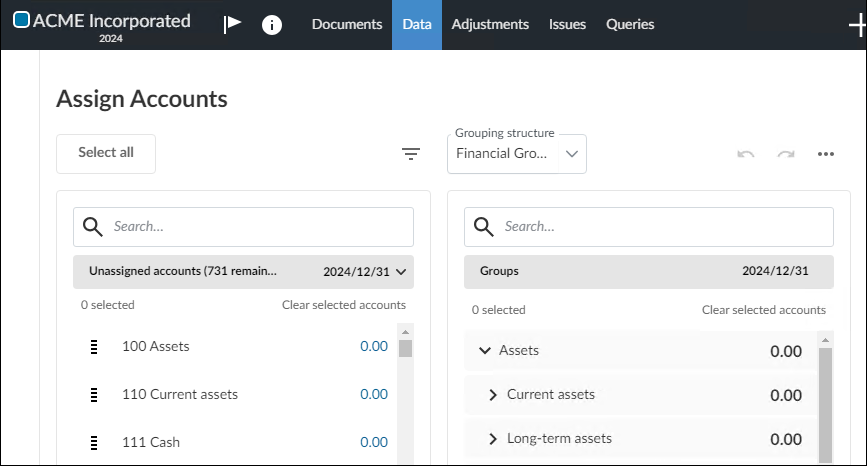
The new or existing Cloud engagement opens automatically. If it does not, click the link in the Generate Accounts Mapping File dialog.
-
In the browser engagement, manually assign accounts as required to generate your intended mapping structure.
Note: You can disregard the balances in this engagement, as they are not relevant when generating the mapping structure.Once finished, simply close the browser.
-
Select the confirmation box stating that you have assigned the accounts in the Cloud engagement, then click Next.
-
The custom mapping file is created in the CloudBridge folder. Click Done.
You can now use the custom mapping file during your CloudBridge data transfer.
Risk mapping
-
Launch CloudBridge and connect to your Cloud server.
-
On the Upload Dashboard, click Generate Mapping | Risk mapping.
-
In the Generate Risk Mapping File dialog, complete the fields as required.
-
AC File location: Click Browse and select the source Working Papers engagement for your mapping/grouping structure.
-
Select Cloud App: Select which Cloud app you are mapping to.
-
Select Cloud Entity: Select an entity on your Cloud server.
Click Next.
-
-
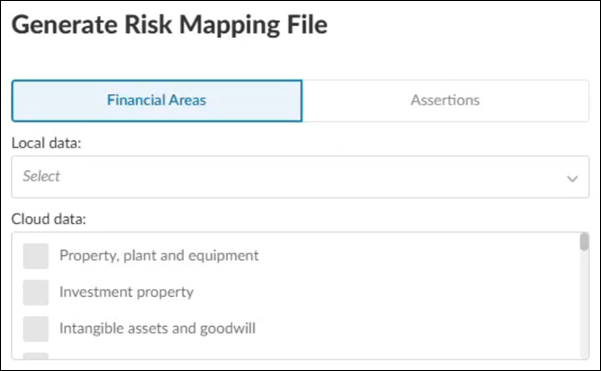
Under the Financial Areas category, map the local data options to the applicable Cloud data options. Repeat this process for the data under the Assertions category.
Click Next.
-
Enter a name for the .ini mapping file. The name must be unique. Click Next.
-
The custom mapping file is created in the CloudBridge folder. Click Done.
You can now use the custom mapping file during your CloudBridge data transfer.