
Create and set up an engagement file
This topic describes how to create an engagement file and provides an overview of the setup process.
Create an engagement file
To create an engagement file:
-
From the Cloud menu, select Engagements.
-
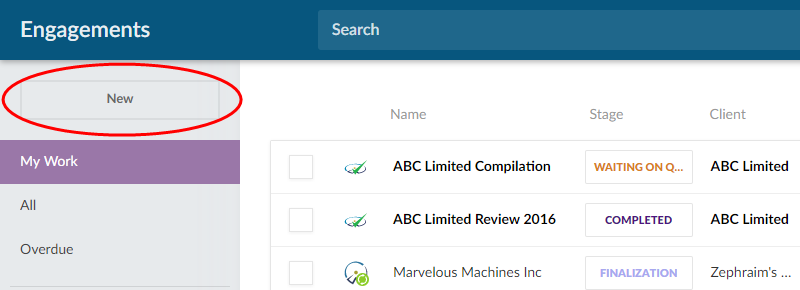
From the Engagements menu, select the New button.
-
In the New Engagement dialog, select your Cloud App.
-
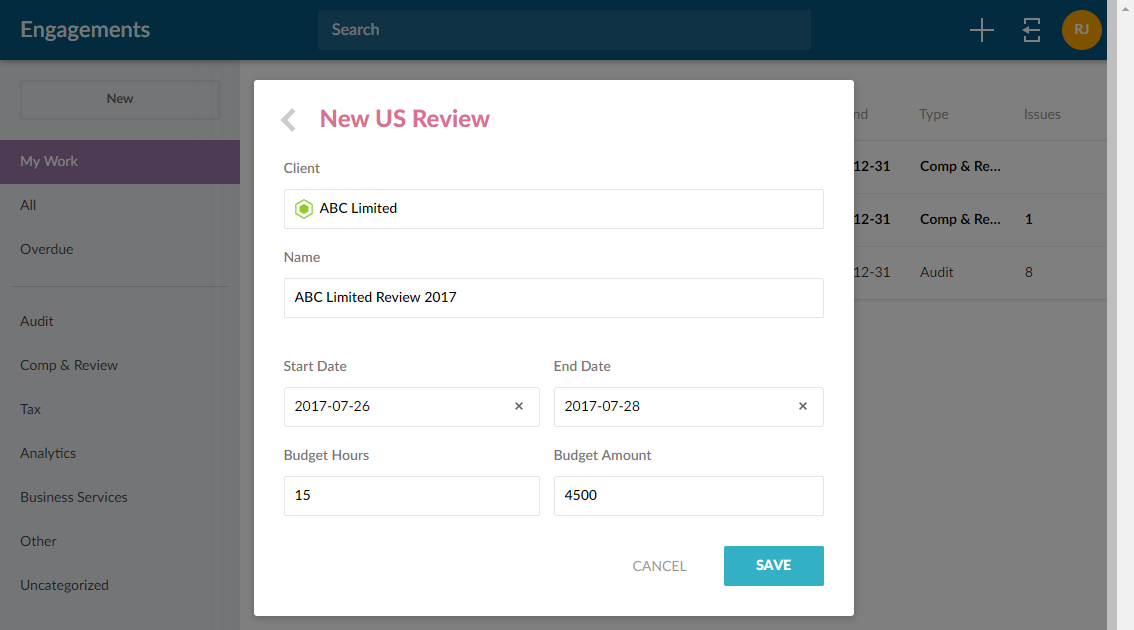
In the next dialog, choose your client entity and enter the name for the engagement file. You can also select the start date and end date for your engagement and enter budget information.
-
Select Save.
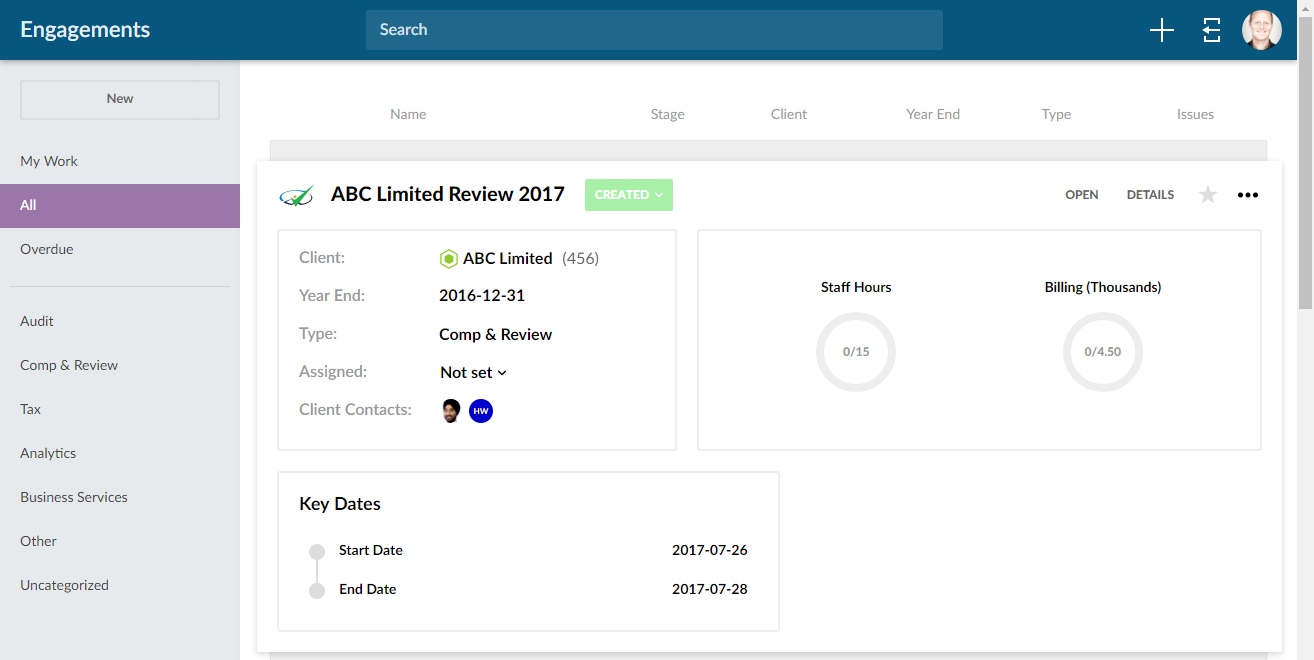
Your new engagement is created. If you select All from the engagement menu to view all of the engagements for your organization, you will see the engagement added to this list.
Assign the preparer and reviewers
Once you have created the engagement file, you can assign its preparer and reviewers. See also, Grant client contacts access to entities for information on how to assign client contacts access to engagements for PBC (Prepared By Client) collaboration.
To start, go to the Engagements page and select the engagement to view its details.
To assign the engagement preparer and reviewers:
-
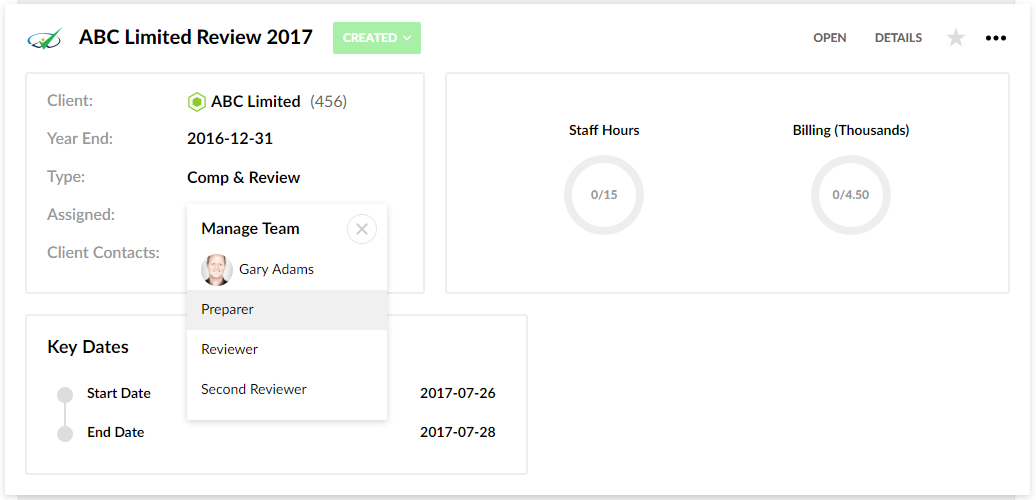
Select the Assigned field.
-
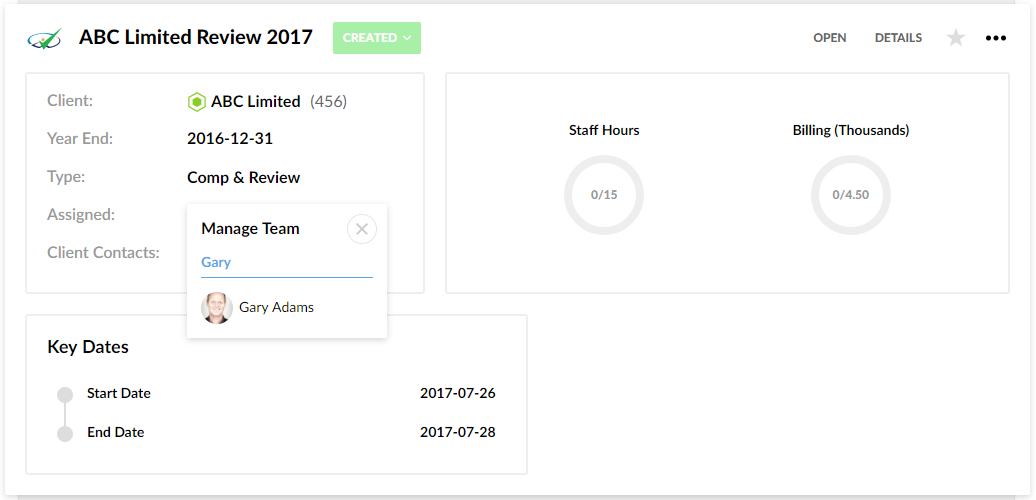
In the Manage Team popup, enter the name of a staff member to populate matching results.
-
Select the desired staff member and choose the applicable role from the list. Repeat the steps to assign staff roles for this engagement.
Set up the engagement properties
To set up the engagement properties:
-
Go to the Engagements page and open the engagement file.
-
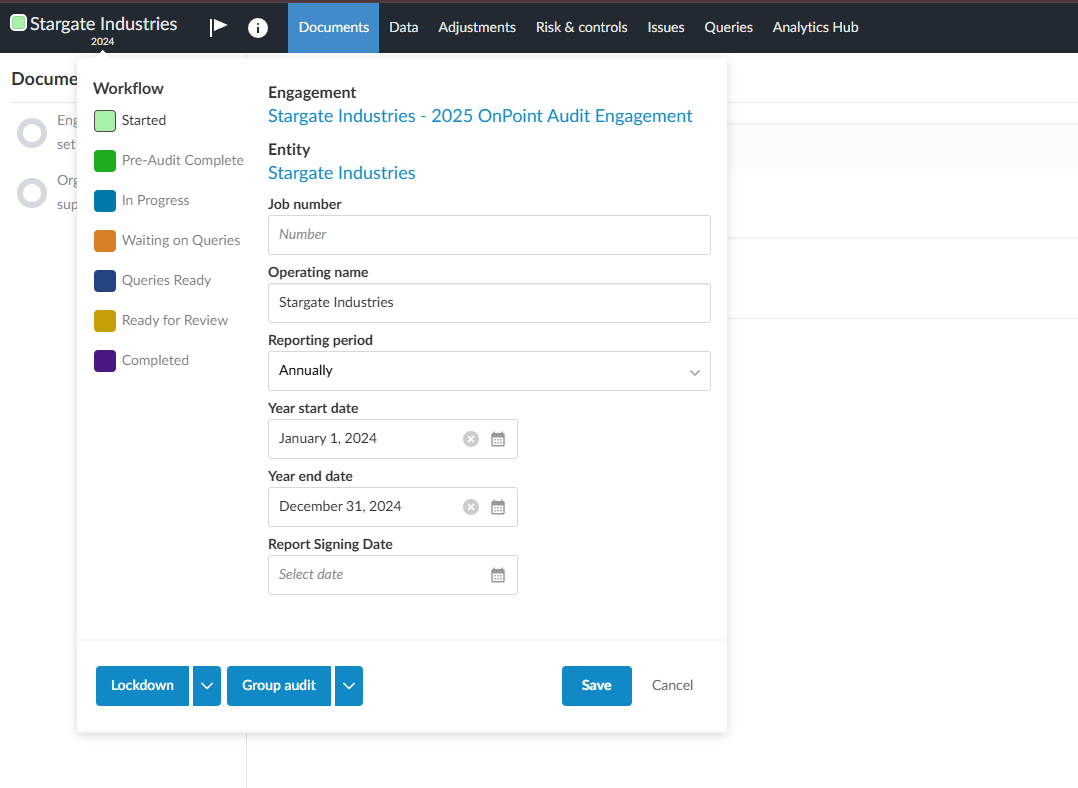
Select the entity name to open the Engagement overview dialog.
-
In this dialog, you can set the following properties:
-
Workflow stage - select a stage for the status of the overall engagement work.
-
Job Number - enter your firm's job number for this engagement.
-
Operating Name - this field shows the Cloud entity name by default. You can change the default and enter a different name.
-
Year End Date - choose a year end date for this engagement.
-
Currency - select the currency for this engagement.
-
Content language - select a language to change the current engagement content language.
-
-
Select the Second Reviewer button to add a second reviewer for all signoffs. The Final Review option is included in all items that require a signoff.
-
Select the Consolidate button to create a consolidation engagement.
-
Select the Lockdown button to lock the engagement file. To learn more, see Lockdown the engagement.
-
Once you have finished updating the properties for your engagement, select the Save button.
Notes:
-
The Content language drop-down menu is only available in the Engagement overview dialog if your Cloud app supports multiple languages.
-
Select the entity name in the Engagement overview dialog to navigate to the entity in your Cloud site.
-
You can open the Engagement Files page from the Engagement overview dialog. The engagement name appears as a hyperlink above the Entity field.
Add external links in the engagement file
You can add external links in the engagement file to include help videos for your clients or other supplementary information.
To add a link in the engagement file:
-
Open the engagement file.
-
Select Documents from the top menu.
-
Select the Create a document icon (
 ), then choose Link.
The Document Properties dialog displays.
- Enter an identifier for the link in the Identifier field.
-
Enter a title for the link in the Name field.
If you do not add a title, a default title for the link displays in the engagement file.
-
Enter the web address for the link in the URL field.
-
Select Save.
You can select Edit Visibility to modify the visibility conditions for the links you add.
Show or hide prior year information
You can also set your engagement file to show or hide prior year information. For example, you can choose to hide the prior year information if the current year is not directly comparable to the prior year.
To hide prior year information in an engagement file:
-
Open the engagement file, then select the Engagement Information icon (
 ) at the top.
 -
Clear the Show carry forward information check box.
Prior year information is hidden in the engagement file.
Select the Show carry forward information check box to show the prior year information in the engagement.
Duplicate an engagement file
You can duplicate a non-locked engagement within the same entity or across entities in your firm. A duplicate allows you to reuse an engagement structure for training, amended filings or related entities.
Features:
-
The new engagement uses the default permissions of the destination entity. Custom permissions from the source engagement are not copied.
-
The duplicate retains the original template source, preserving standard carry-forward behavior.
-
For consolidated engagements, the duplicate retains component taggings and internal entity hierarchies.
To duplicate an engagement:
-
Open the non-locked engagement you want to copy.
-
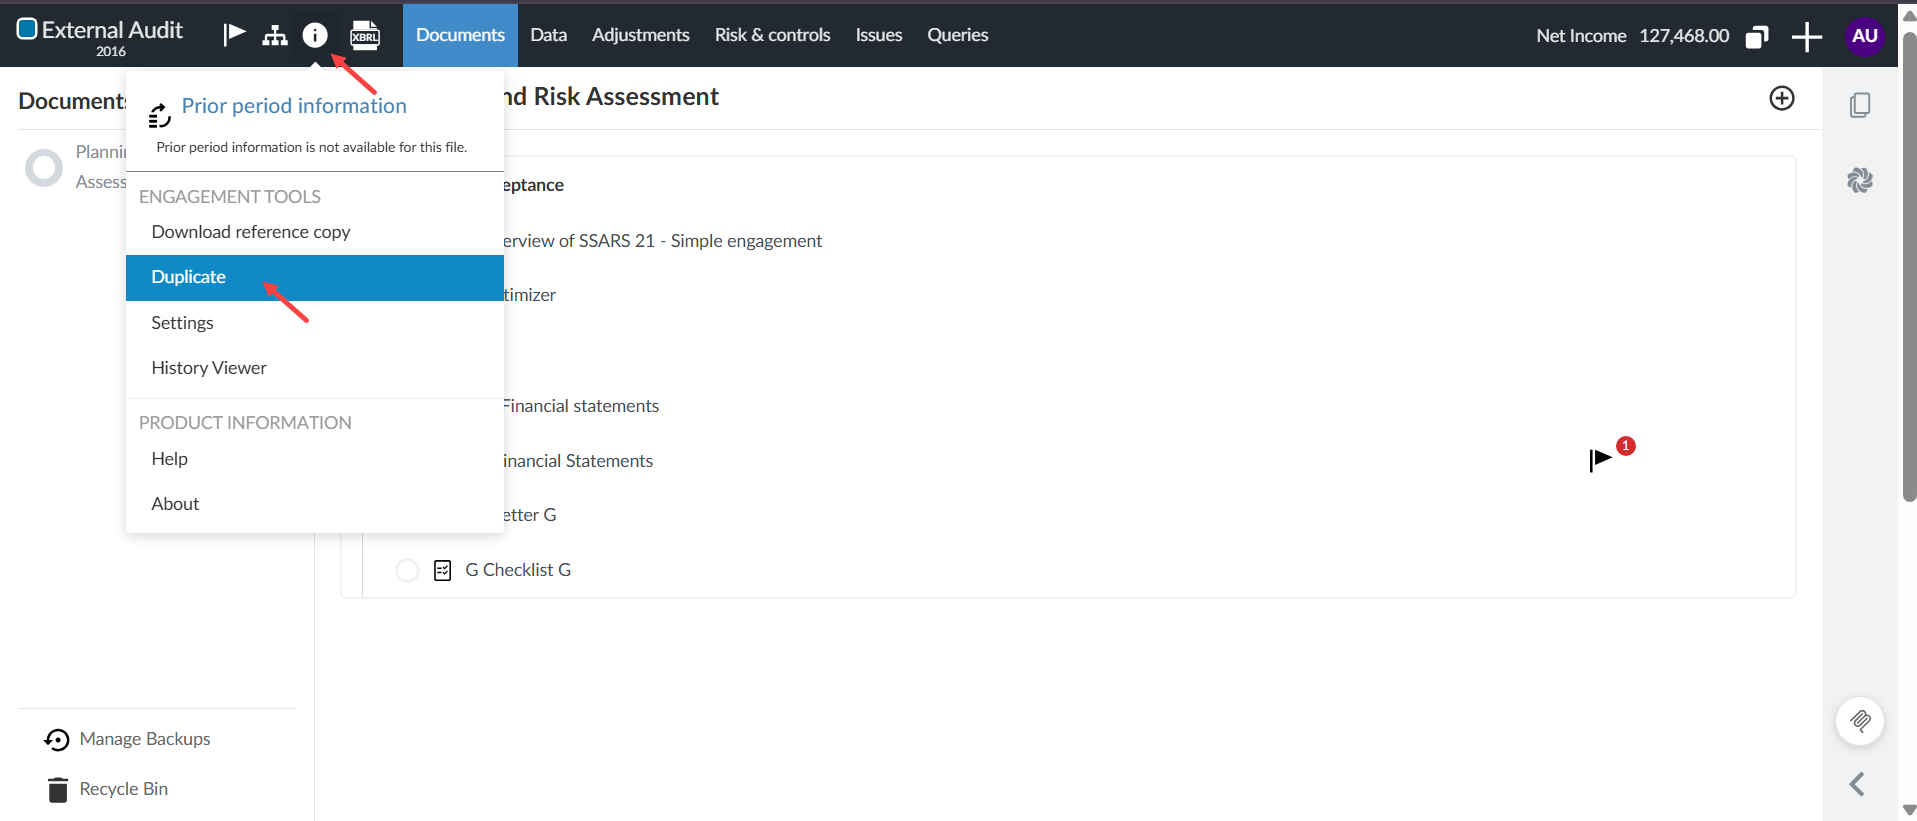
Select the Information icon [
 ] at the top-left of the screen.
 -
Select Duplicate.
-
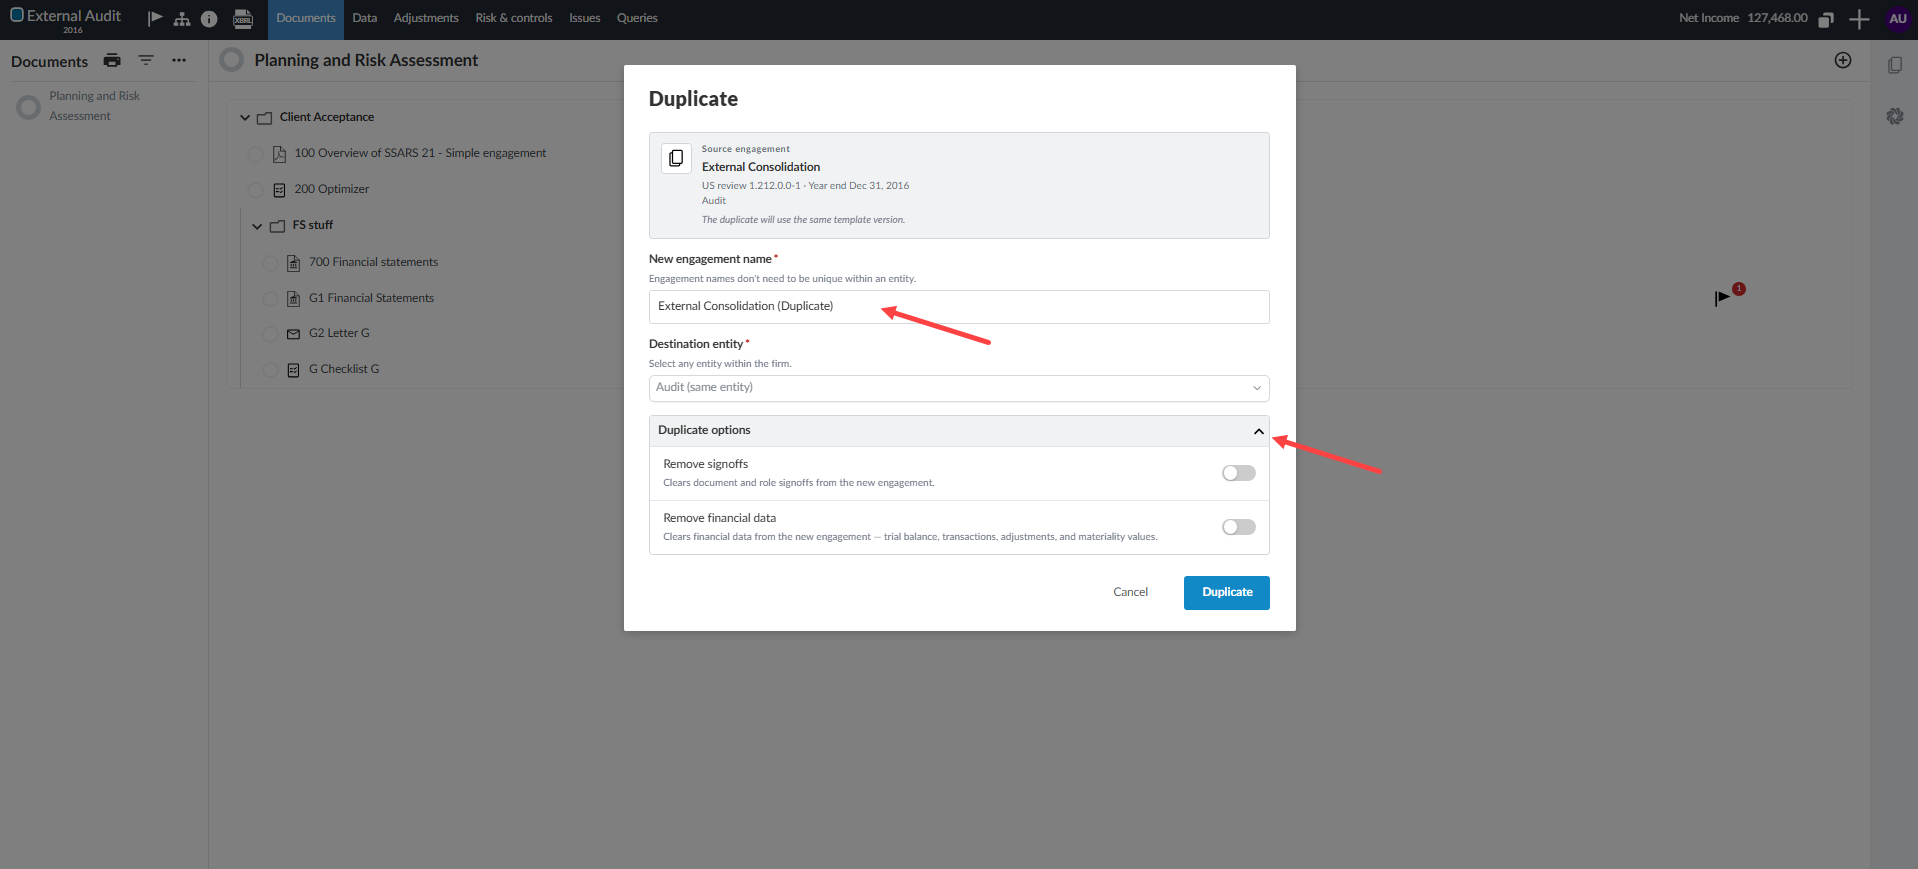
In the Duplicate dialog, review or edit the Engagement name. The name will default to the source engagement name followed by (Copy).
-
Select any entity within the same firm as the Destination entity. This selection defaults to the current entity.
-
(Optional) Expand Duplicate options and select any options that apply:
-
Remove signoffs: Clears all document, procedure and risk signoffs from the new engagement.
-
Remove financial data: Clears the trial balance, raw imports and related transaction data from the new engagement
-
-
Select Duplicate.
Duplication rules and limitations
-
Locked engagements cannot be duplicated. Unlock the engagement before copying.
-
Engagements cannot be copied across different firms or between different Caseware Cloud apps.
-
Central Planning parent engagements are copied as standalone engagements; child engagement structures are not included.
-
External consolidation structures cannot be copied entirely; only individual parent or child engagements can be copied.
Excluded platform data
The following are always excluded from the duplicate:
-
History events of the source engagement
-
Recycle Bin content
-
User-managed backups
-
Financial Statement Versions Control
The Duplicate feature on an engagement:
The Duplicate dialog:
Data Analytics in duplicated engagements
When you duplicate an engagement, its Data Analytics transaction data is included by default. This includes raw imports, General Ledger (GL), sub-ledger and schemaless transaction datasets.
Analytics execution history and previous results (including sampling results) are excluded from the duplicate.
Selecting the Remove financial data option from the Duplicate dialog excludes all trial balance data, raw imports, associated Data Analytics transaction datasets, and related metadata.