
Request information from clients
To request information and documents from clients, create a request in your engagement. You assign the items within it to client contacts, send it to them and then review and accept the responses that come back.
How a request is organized
A request consists of the following components:
-
Request questions - The requests and inquiries that clients need to respond to.
-
Question sets - To group related request questions.
-
Response types - To specify the expected client response.
-
Instructions - To provide guidance information for the clients. For example, add the supported file types for a document request.
You need at least one question set before you can add a request question. You can put everything into one request with several question sets or create a separate request for each area.
The following table describes the available response types:
| Response type | Expected client response |
|---|---|
| File Upload | Browse and add a requested file (or drag and drop the file) |
| Picklist | Select one item from the drop-down list |
| Multi Picklist | Select one or more items from the drop-down list |
| Text | Enter the requested information |
| Date | Select a date from the calendar |
| Simple Electronic Signature | Choose whether to sign the document manually or accept it electronically |
Create a request
You can create a blank request or start from one within your product template.
To create a request:
-
On the Documents page, navigate to the folder where you want the request.
-
Select the Add (
 ) icon, then select Request.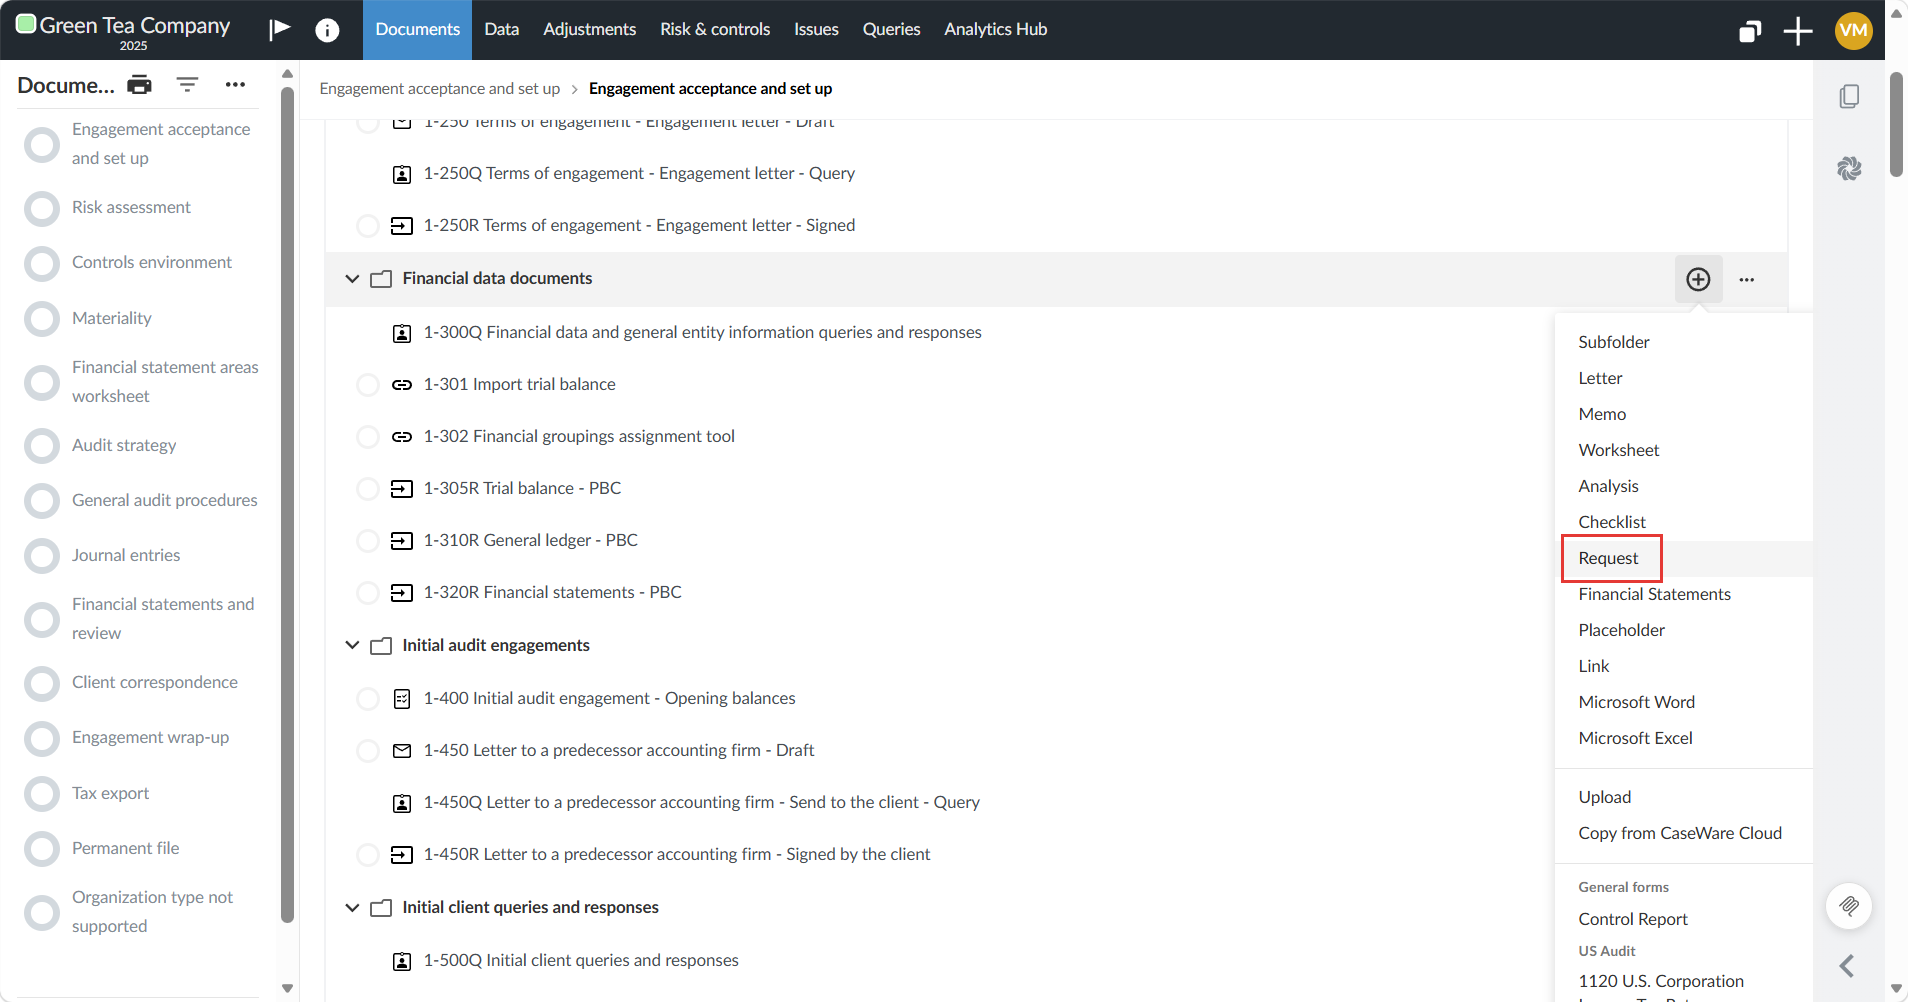
-
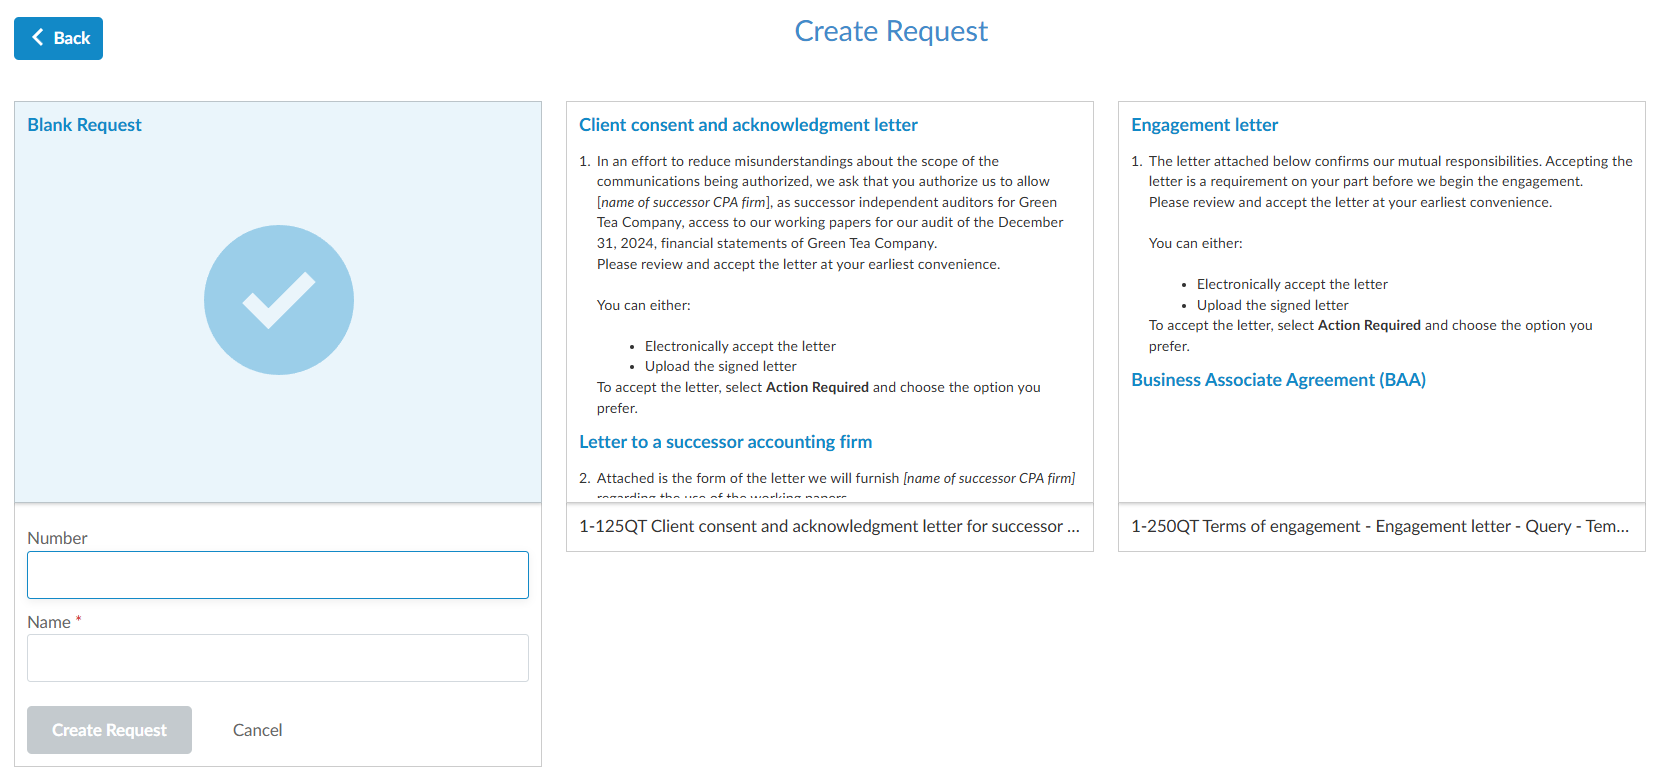
Select Blank Request to build your own custom request or select one of the available templates.
-
Enter a Number. Use a unique value without spaces.
-
Enter a Name.
-
Select Create Request.
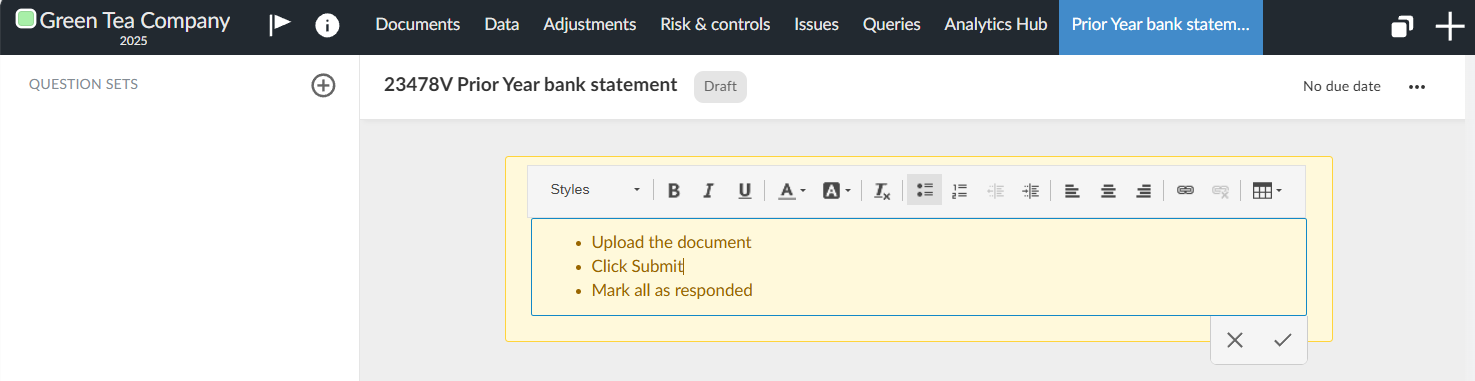
The request opens in Draft. Add instructions for the assigned contact, then select the check mark to save them. You can then build the request by adding question sets and request questions.
Add question sets
Question sets can help you organize your inquiries and requests. Use question sets if you want to group related request questions in the request.
To add a question set:
-
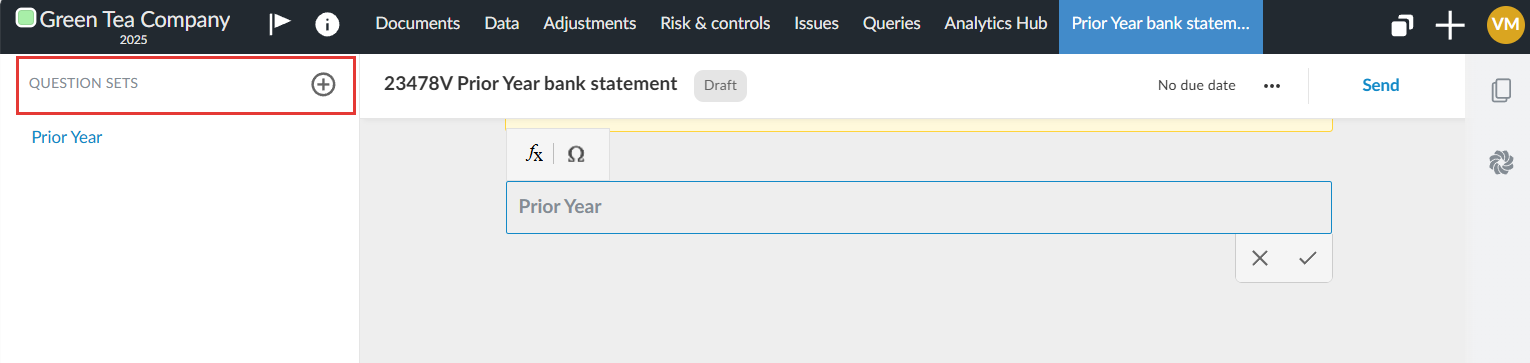
In the QUESTION SETS panel, select Add (
). A new question set is added with the default title New Group. -
Select the default title and enter a name for the question set.
You can remove a question set by hovering over it and selecting the Delete ( ) icon.
In the left navigation panel, you can expand or collapse question sets.
Add request questions
A request question is a request or an inquiry directed to the client contacts. Each request question asks for one thing, and the response type determines how the client responds.
Before you add a request question, add at least one question set to the request. A request question must be part of a question set. To add a question set, see Add question sets.
To add a request question:
-
Go to the question set where you want to add a request question.
-
Select the Add Request Question (
 ) icon and select the response type: File Upload, Picklist, Multi Picklist, Text, Date or Simple Electronic Signature.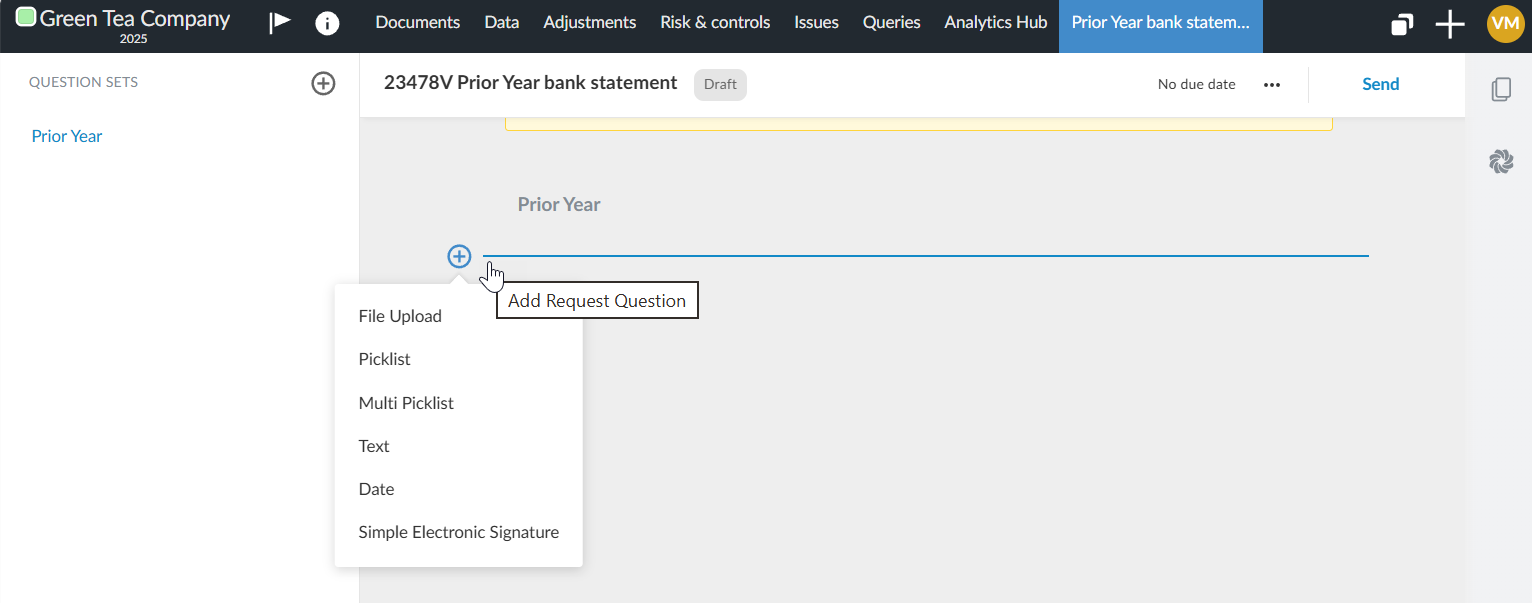
-
Select the default title and enter a title and summary for the request question.
-
Enter the question or inquiry you want the client to respond to. Once you select the text field, the formatting toolbar and the Cancel and Save buttons display.
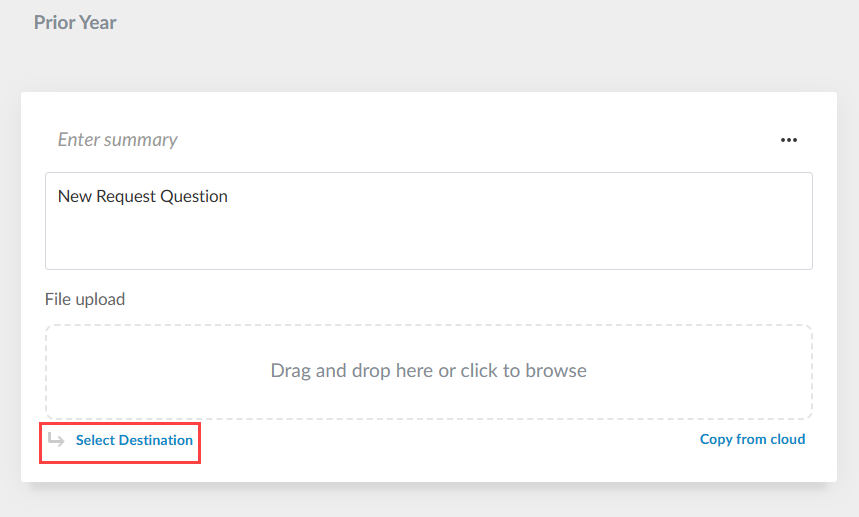
For a File Upload request question, select the Select Destination button on the question to choose where the accepted file is saved.
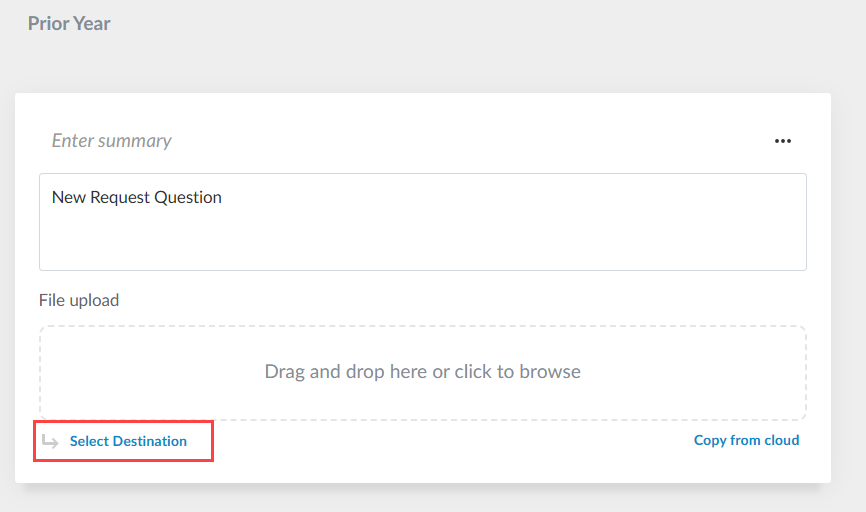
To learn more about the Select Destination and Copy from cloud options, see Create a placeholder and Save accepted files to the engagement.
To delete a request question, select More actions ( ) | Delete. You can delete a request question while it is Awaiting Response, Response Submitted or Returned. You cannot delete a request question once it's Accepted.
Link a request question to a checklist
You can link a request question to a field on a checklist in your engagement. When you accept the client's response, the checklist field is filled in automatically, so you don't have to enter the answer yourself.
Linking is most useful for response types that return a single value, such as Text, Picklist and Multi Picklist.
To link a request question to a checklist:
-
On the request question, select More actions (
) | Link to checklist.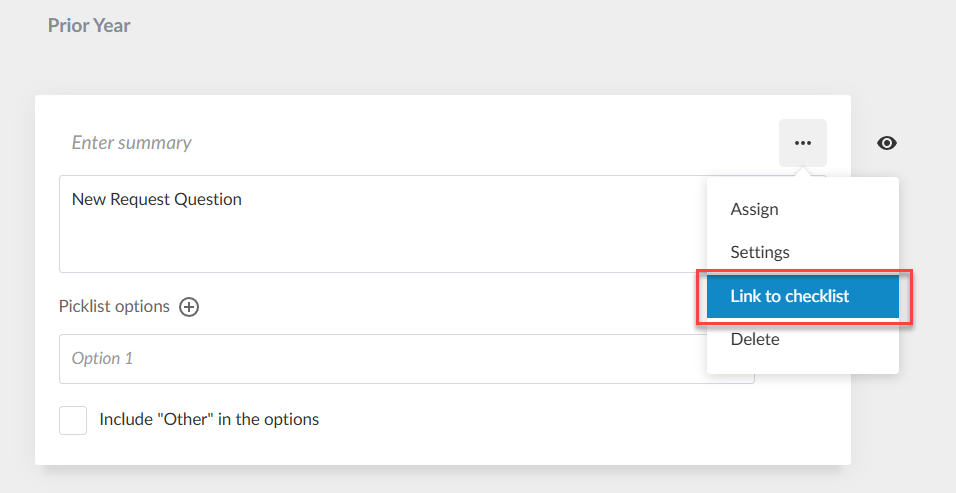
-
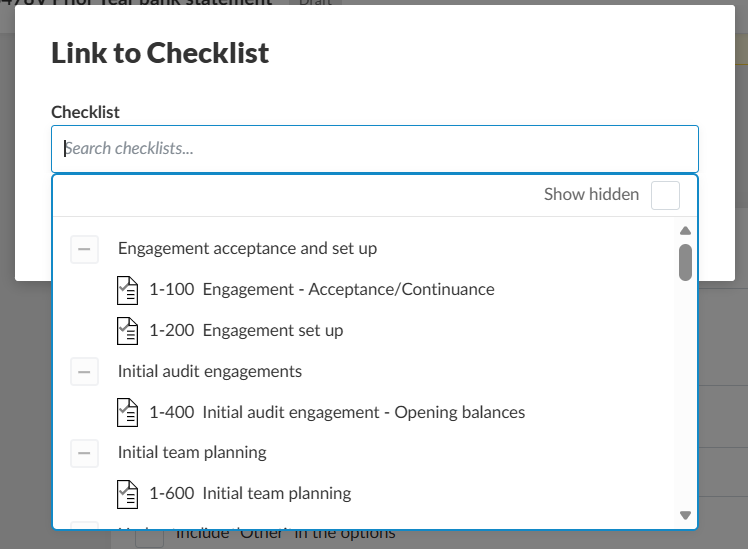
Select the checklist you want to link to.
-
Select the field on the checklist that the response fills.
-
Select Save.
For example, you can link a Text request question asking which industry the entity operates in to the industry field on the 2200 Identifying risks checklist. When the client answers Agriculture and you accept the response, the checklist field shows Agriculture.
Create a placeholder
Before you can save an accepted file into the engagement, create a placeholder to reserve the spot where the file will go.
To create a placeholder:
-
On the Documents page, select the Add (
) icon in the folder where you want the file saved, then select Placeholder.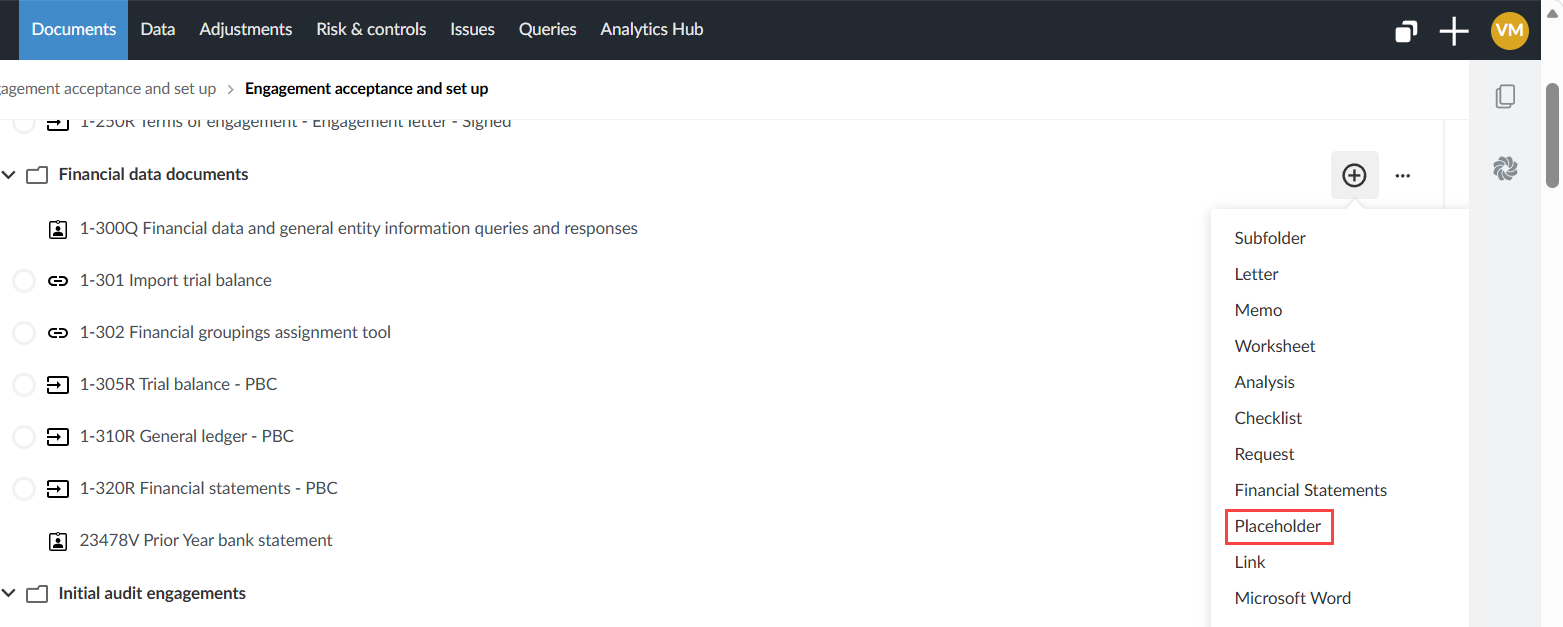
-
In the Document Properties dialog, enter an Identifier and a Name.
-
Select Save.
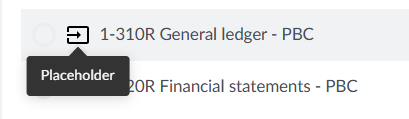
A Placeholder icon ( ) displays next to the placeholder on the Documents page to identify it.
Save accepted files to the engagement
For a File Upload request question, you can choose where the accepted file is saved in the engagement.
To set the target location:
-
In the request question, select Select Destination.
-
In the File response settings dialog, search for or select the Target folder or placeholder. Select Show hidden to include hidden documents in the list.
-
Enter an Identifier and a Name.
-
Select Save.
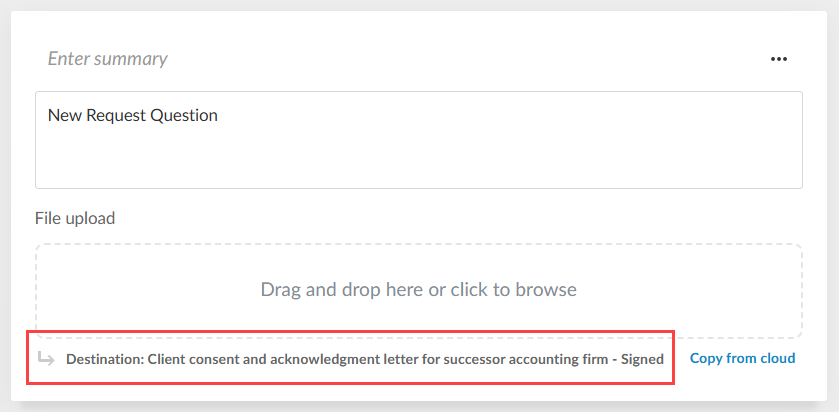
Once the destination is set, the link displays the target as Destination: followed by the name of the folder or placeholder you created.
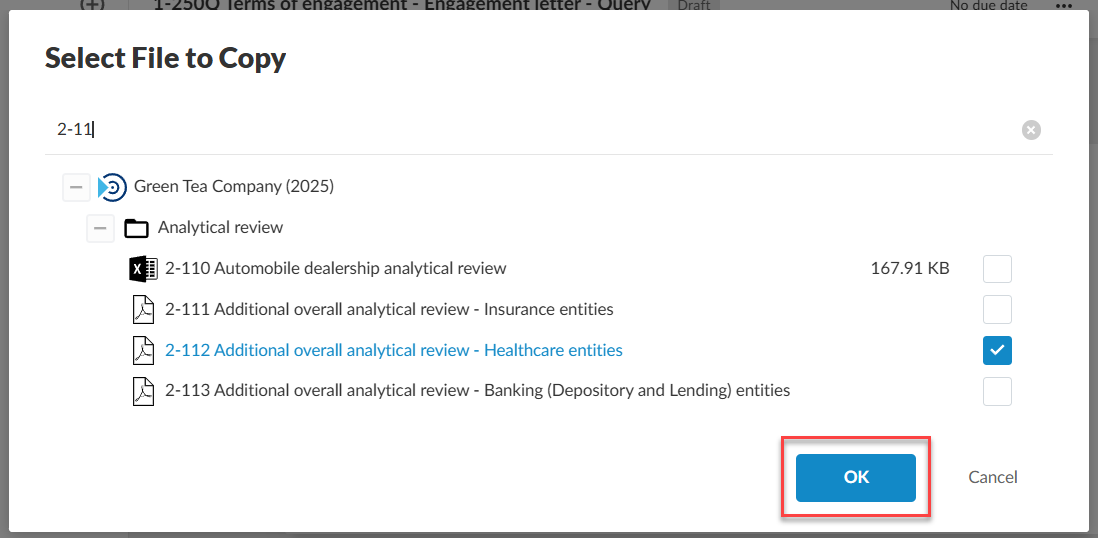
Select Copy from cloud to copy a file from another engagement instead of asking the client for it again. In the Select File to Copy dialog, expand Other Engagements, select the engagement and the file you want, then select OK.
Assign request questions and due dates
Assign the entire request to the contacts who need to see all of it and assign individual request questions to the people who hold that information.
A contact assigned to a request question sees only that question, its question set title and the request title.
To assign a request question:
-
On the request question, select More actions (
) | Assign.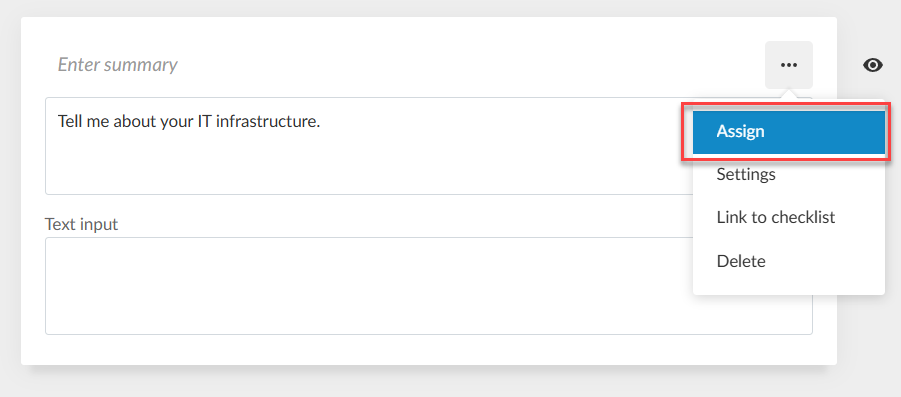
-
In the Assign Request Item dialog, select a Due date if the question is needed sooner than the rest of the request.
-
Search for and select the client contact in Assignees.
-
Select Save.
Contacts already assigned to the whole request appear in the dialog marked Assigned to request.
Set visibility conditions on a request
You can set visibility conditions on a request so it only appears in the engagements where it applies. This lets you control which requests your team sees, so staff working on an engagement only see the ones relevant to their work.
The request is shown or hidden based on conditions you set, such as the reporting period, the organization type or a response in another document.
To set visibility conditions, select the request on the Documents page to display the Document Properties dialog, then select Edit visibility.
To learn more, see What are visibility settings and Visibility conditions and examples.
Send a request
After you have reviewed the request content and made any necessary changes, you can send the request to contacts. Once you send it, you are automatically subscribed to email notifications about the request.
To send the request to contacts:
-
Open the request, then select Send.
-
In the Open Request dialog, select a Request Due Date.
-
Search for and select a client contact in Assignees. You can select more than one contact or select Assign to all contacts to send the request to every contact for that client.
-
If the contact doesn't exist yet, select Create new contact to add them in Cloud. To learn more about how to add a client contact to an entity, see Create an account for staff or contacts and Grant users and groups access to entities.
-
Add a message in Email Body to be included in the notification email.
-
Select OK.
A notification email is sent to the assigned contacts with a link to the client portal. The request moves to Sent, which the client sees as Awaiting response.
Review responses
Once you send a request, the left navigation panel shows status filters. Select a filter to move through the responses you need to review.
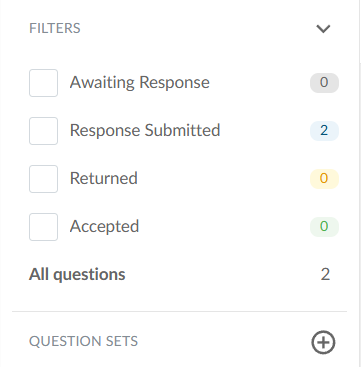
When a client submits a response, you receive an email and the request question changes to Response Submitted. If a client resubmits after you return a question, you are notified again.
Accept or return a response
If the information provided in a response is valid, you can accept the response. Select the Accept button at the bottom of the request question.
You can also return a response back to the contact if the information or documents provided are insufficient, incorrect or need clarification. Select the Return button at the bottom of the request question.
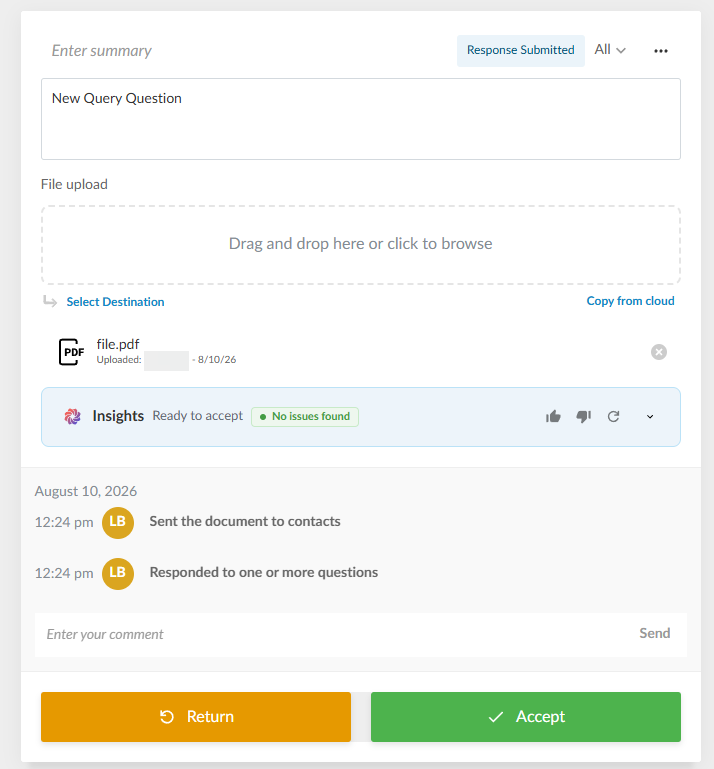
You can accept a request question that has no response, but entering a note is required so the reason is recorded. You can also return a question you have already accepted.
When you accept a File Upload response, the files are saved to the target location you set. All the files the client uploaded appear there, and you can delete or replace any of the files from the Documents page.
If the request question has the Simple Electronic Signature response type and the contact has accepted electronically, you can select Signed electronically to review and download the signature details.
Submit a response for a client
Where you already have the document or a client can't submit it themselves, you can submit the response on their behalf.
To submit a response for a client:
-
Open the request question.
-
Attach the document or enter the response.
-
Submit the response.
Add comments
Contacts and staff can add comments as needed. User initials, date and timestamp of all interactions display in the Comment field.
To add a comment:
-
Go to the question where you want to add comments or notes.
-
Enter your comment in the Comment field below the question.
-
Select Send.
You can also select More actions () next to your comment and then select Edit or Delete to edit or delete your comments. Timestamps for edited and deleted comments display in the comments area, and the term Deleted displays for a deleted comment along with the timestamp.
Review the request question history
The comments area also displays the request question history, with the timestamp and username for the following actions:
-
Request is sent to the contact
-
Contact responds to the question
-
Response is accepted
-
Response is returned
To view only the history, select More actions () | Hide comments at the top of the page.
The question history is also included in the engagement archive when you use the Download reference copy option.
Cancel a request
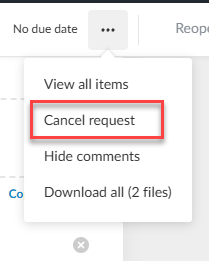
You can cancel a request at any point as long as it is not Accepted. Select More actions () | Cancel request to cancel a request. The request status changes to Cancelled and cancelled requests are no longer visible in Cloud to the assigned contacts.
) | Edit to change the request name and edit visibility settings.