
Author content and deliverables in multiple languages
Authoring content and deliverables in multiple languages helps support product offerings in regions and markets where multilingual capabilities are required.
For firm or enterprise authors, multilingual support enables the flexibility to switch the language of content and deliverables directly within the engagement file. This allows for efficient content creation and updates.
Recommendations for multilingual implementation
To set up translated versions of note disclosures, letters, query questions or checklist procedures you can create multiple versions in different languages.
Notes:
-
Manual translation required: Multilingual capabilities do not automatically translate content. You must provide translations for all supported languages.
-
Language deletion: Removing a language from the template settings does not delete any translated content already added.
-
Carry forward behavior: The selected content language is carried forward to the next period’s file.
-
Language management:
-
Firm authors cannot add or delete languages.
-
Firm-level content language changes are preserved during updates from the product template.
-
Caseware language settings will override the firm or enterprise template once you update the template. For more information, see Authoring index.
-
Select available languages for an engagement
Caseware can set which languages and how many languages are available for documentation within an engagement. As an enterprise or firm author, you can select which languages to include based on the available languages set by the Caseware.
To select languages for an engagement:
-
From the product template, click the [
 ] Information button at the top of the screen.
 -
Select the Settings option to open Product Settings.
-
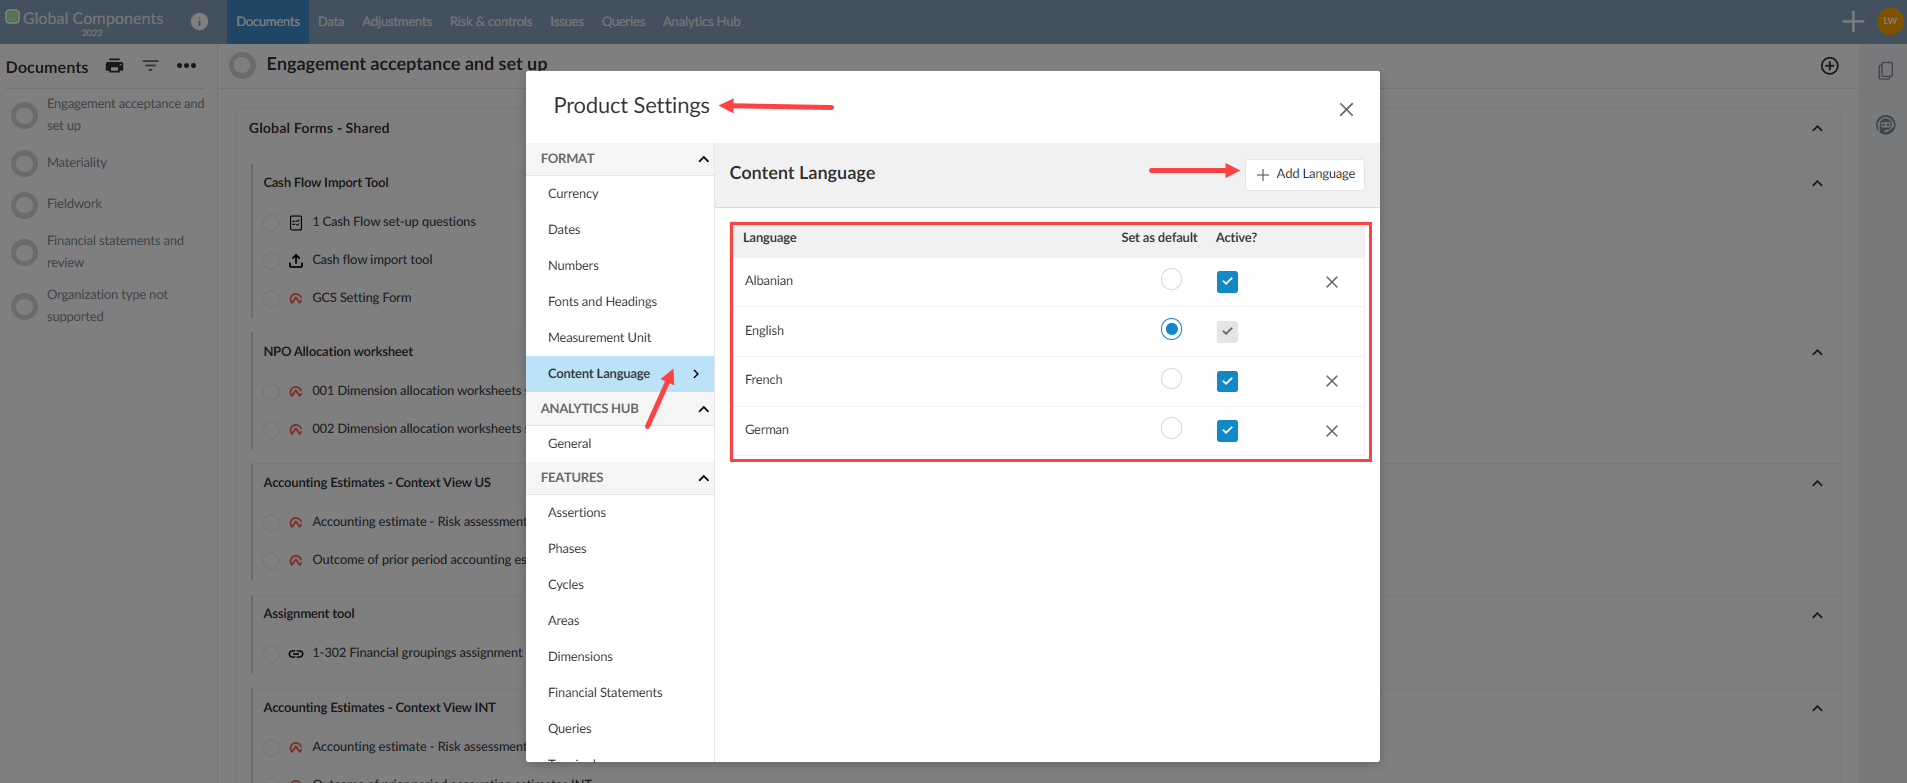
Select Content language under the Format section
-
In the table, you can select or deselect languages for availability in your engagements.
-
You can also set one language as your default language.
-
Add multiple languages to labels
As an author, you can use Product Settings to translate existing labels into multiple languages. The labels appear to users in the content language set for the engagement.
The settings available to you depend on your authoring role.
| Product Settings access | Enterprise authors | Firm authors |
|---|---|---|
| Features | Assertions | Can modify existing. Can add. | Cannot access. |
| Features | Phases | Can modify existing. Can add. | Cannot access. |
| Features | Cycles | Can modify items created by them. Can add. | Cannot access. |
| Features | Areas | Can modify items created by them. Can add. | Can modify items created by them. Can add. |
| Features | Dimensions | Can modify items created by them. Can add. | Can modify existing. Can add. |
| Features | Components | Can modify items created by them. Can add. | Can modify items created by them. Can add. |
| Risks | Fields | Can modify items created by them. Can add. | Cannot access. |
| Risks | Scales | Can modify items created by them. Can add. | Cannot access. |
| Controls | Fields | Can modify items created by them. Can add. | Cannot access. |
| Signoffs | Roles | Can modify items created by them. Can add. | Can modify items created by them. Can add. |
To add languages to labels:
Before you begin, ensure at least two content languages are configured in your template. See Select available languages for an engagement for information about selecting available languages.
-
Open your template.
-
Open the Entity's Detail dialog.
-
Under Content language, select the language you want to add labels for.
-
Select Information [
 at the top left of the window.
 -
Select Settings. The Product Settings dialog opens.
To add translated labels under Features:
-
Under Features, select the item you want to add a translated label to:
-
Assertions — enter the translated label for each assertion.
-
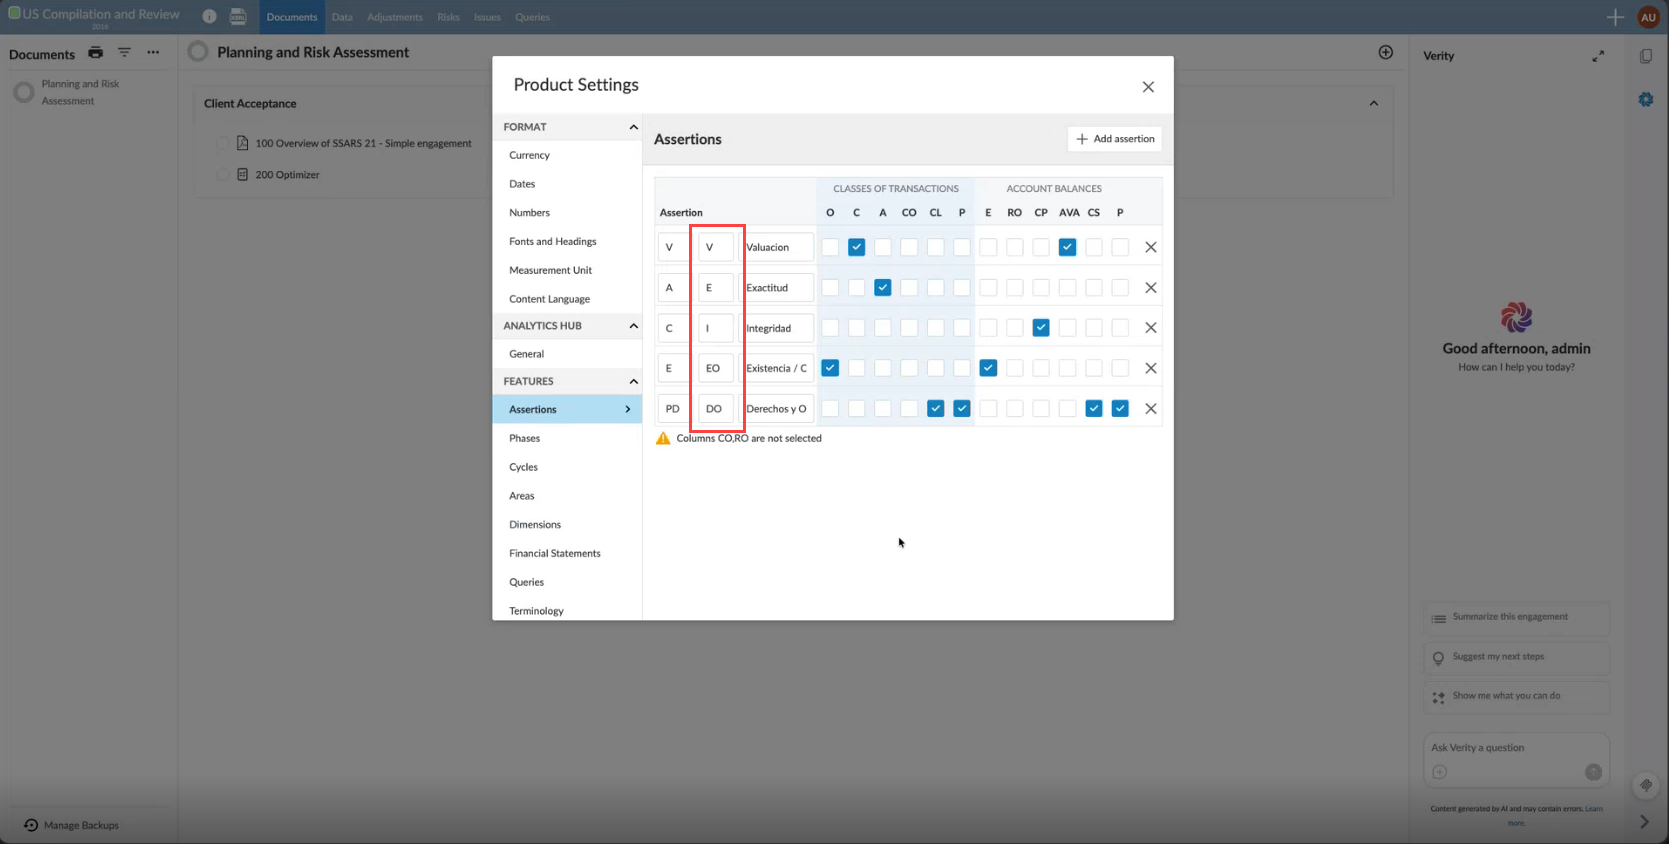
Abbreviation — enter the translated abbreviation for each assertion in the second Assertion column.
-
Note: Do not modify the first column — it drives calculations and formula references and serves as the default.
-
-
Phases, Cycles and Areas — enter the translated label for each phase, cycle and area.
-
Note: The Areas tab is only available if it has been enabled by Caseware.
-
-
Dimensions — enter the translated label for each dimension category and dimension.
-
Components — enter the translated label for each component category, component name and component ID.
-
An example of assertion abbreviations:
To add translated labels under Risks, Controls and Signoffs:
-
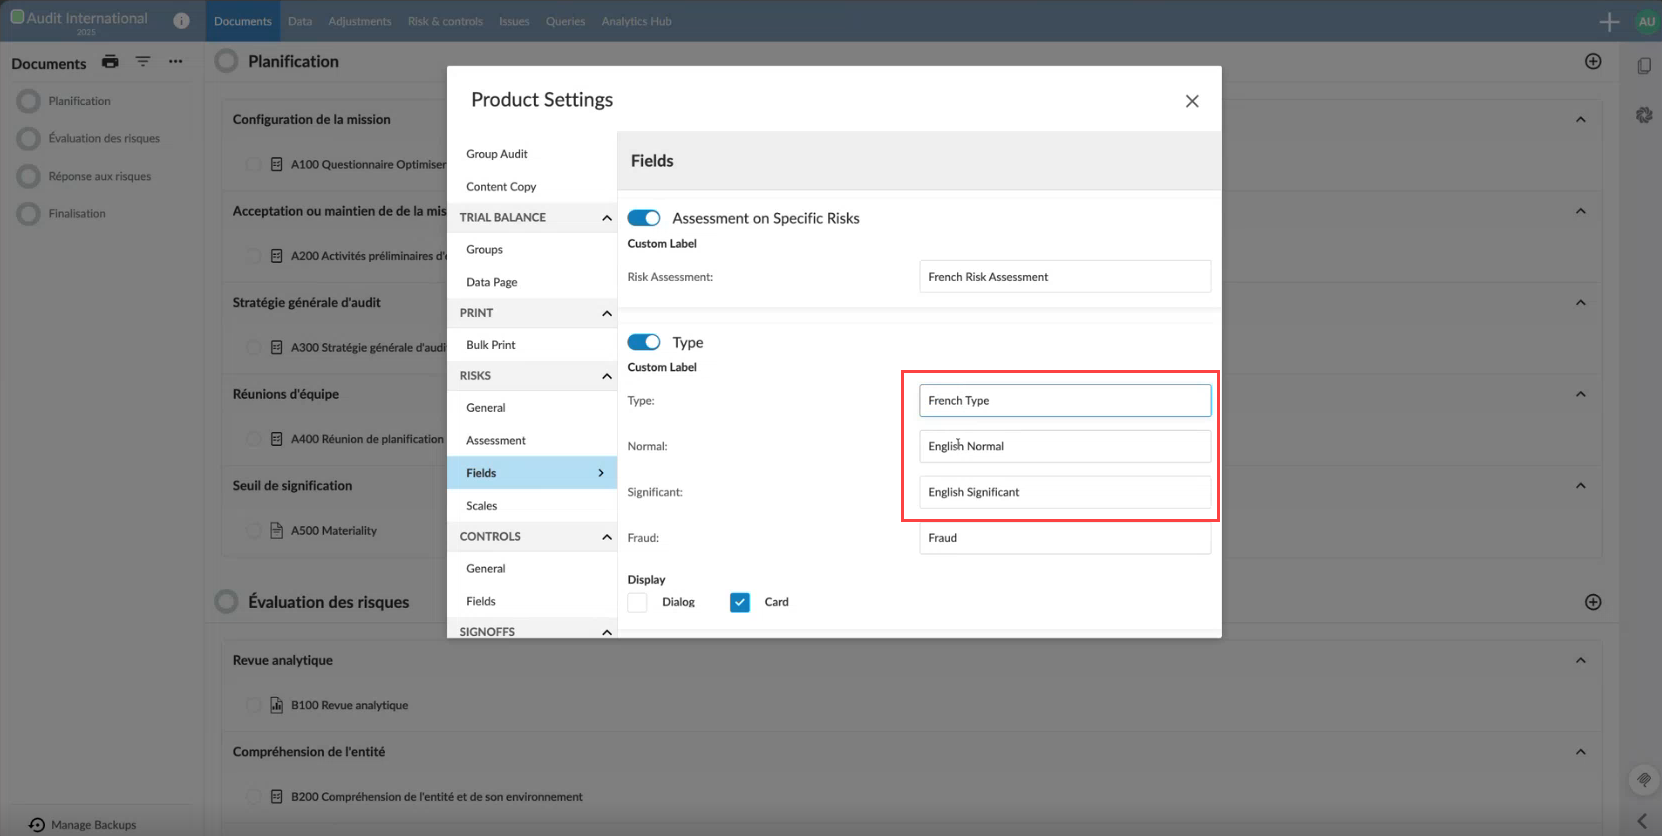
Under Risks, select Fields or Scales and enter the translated label for each field that allows customization.
-
Under Controls, select Fields and enter the translated label for each field that allows customization.
-
Under Signoffs, select Roles and enter the translated label for each role name.
An example of the Risks | Fields dialog:
Repeat steps 3–9 for each supported content language, then publish the template.
Add multiple languages to engagement content
Unlike labels, which are configured in Product Settings, you add multiple languages to engagement artifacts directly on the template. Engagement artifacts includes the text, instructions and methodology that users interact with in an engagement such as checklists, letters, financial statements and the risk library.
The following instructions use French as an example of how to add content in another language using a firm template or an engagement file. If multiple languages are supported in your product, you can author the content and deliverables (and make changes to existing ones) in more than one language.
Notes:
-
Authoring in multiple languages can be done by firm authors in the firm template or staff members in an engagement file.
-
You must repeat the steps listed in this use-case for each language that you need to author content and deliverables for.
Assumption: English content and deliverables have already been added and authored in the template.
Before you start
-
Ensure the language (or languages) that you need to author in are active. For detailed instructions, see Content language.
-
Ensure you have the translated content for all the languages that you need to author in. The application does not automatically translate text.
-
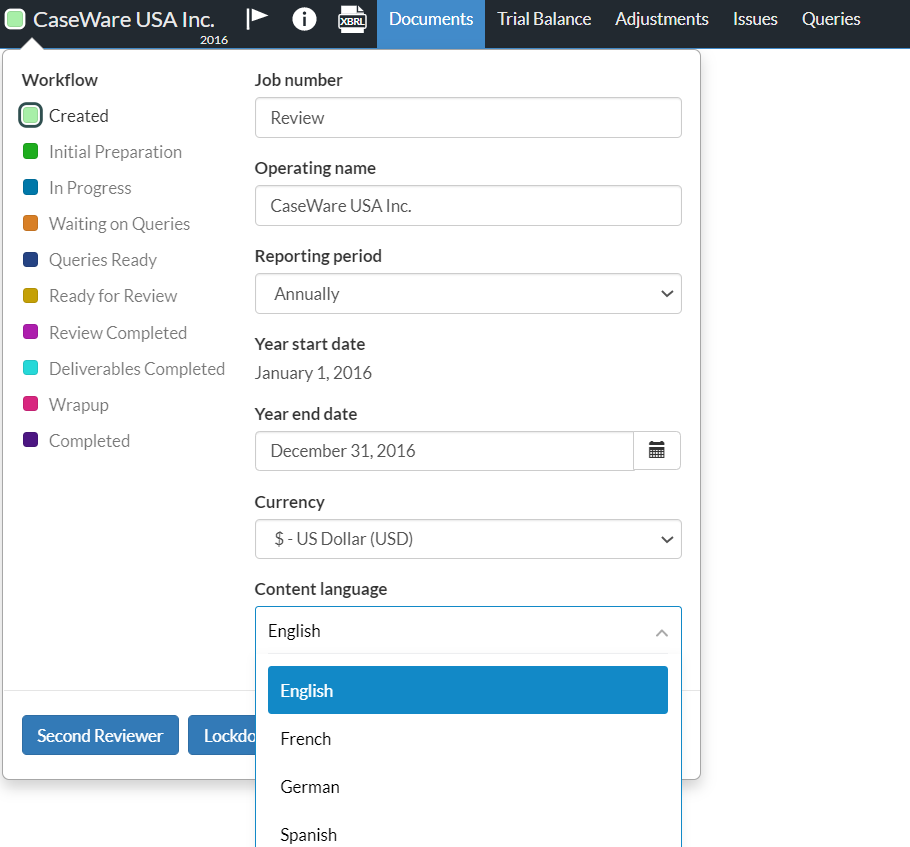
Switch the Content language of the template to the language you want to author in (in this use-case, switch to French).
Note: On carry forward, the selected language in the current period file is carried over to the next period's file.
Select content in another language
To input or edit translated content in any of the above areas, follow these steps:
-
Select the top-left corner of the engagement to open the Entity dialog.
-
Under Content Language, select a preferred language from the drop-down menu. This setting applies to the current editing session.
-
Go to the Documents page to access the relevant form or checklist.
-
Open the form (Materiality or Summary of Misstatement) or a checklist, depending on what you want to update.
-
Select into an editable field to add or edit content in the selected language.
-
Select the checkmark beside the field to save the content.
-
Repeat if you require the same content in other languages. For checklists, you can click editable fields from both the Procedure and Guidance tab.
-
For the Checklist Procedure settings: Select the Edit icon [
 ].
]. -
Select the Checklist Settings icon [
 ].
]. -
Add or edit content in the selected language in an editable fields.
-
Select Save.
Repeat if you require the same content in other languages.
Letters/memos
To add and select a French version for the letter or memo content:
-
Select +New section to add a section for each piece of content that needs to have a French equivalent.
-
Enter the French content in the corresponding section.
-
Add the following visibility logic for each French section.
-
Select More actions [...] | Edit [
]. -
Select Edit Visibility, then select Language from the Add Condition drop-down.
-
Set the Content language is parameter to French.
-
Change the condition logic to Show.
-

Checklists and queries
As a firm or enterprise author, you have multilingual capabilities in the editable fields of checklists that are authored by you. This includes editable fields in the following areas within your checklist:
-
Guidance fields:
-
accessed from within the Procedures tab
-
accessed from the Guidance tab of your checklist
-
-
Titles for the following within the Checklist and Procedure Settings:
-
Guidance title
-
Risk title
-
Conclusion title
-
Note placeholder title
-
Response placeholder text
-
Other field in response options
-
Within the Procedures tab:
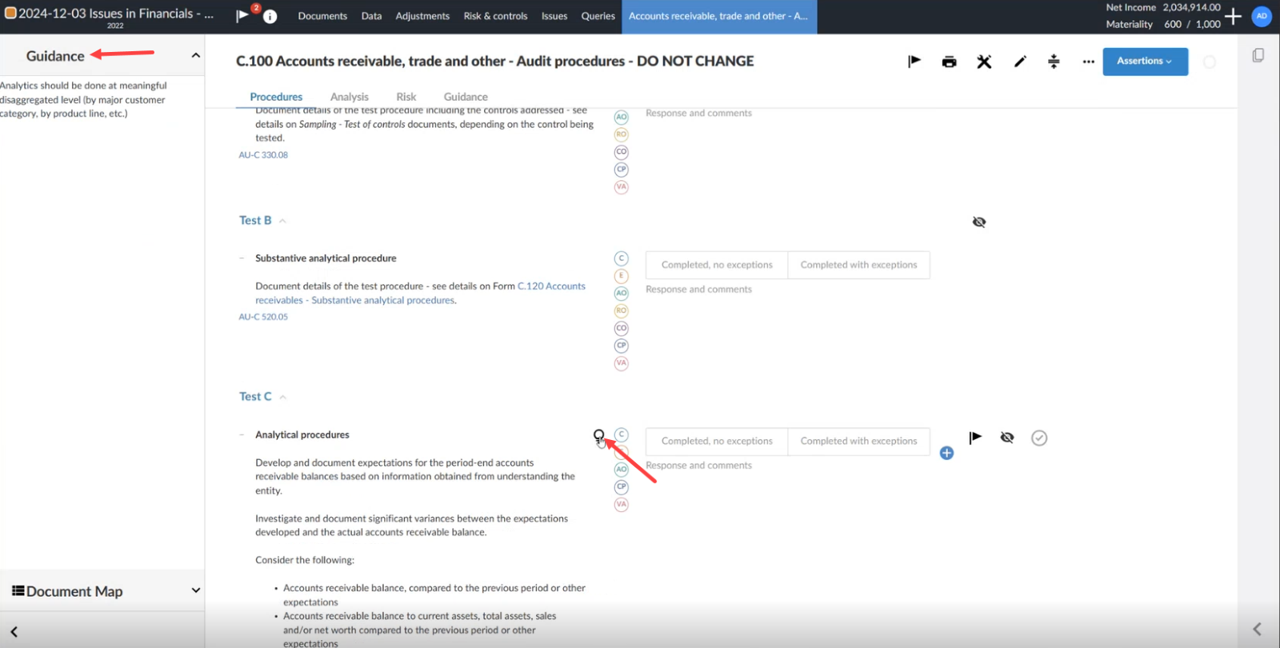
From the Guidance tab:
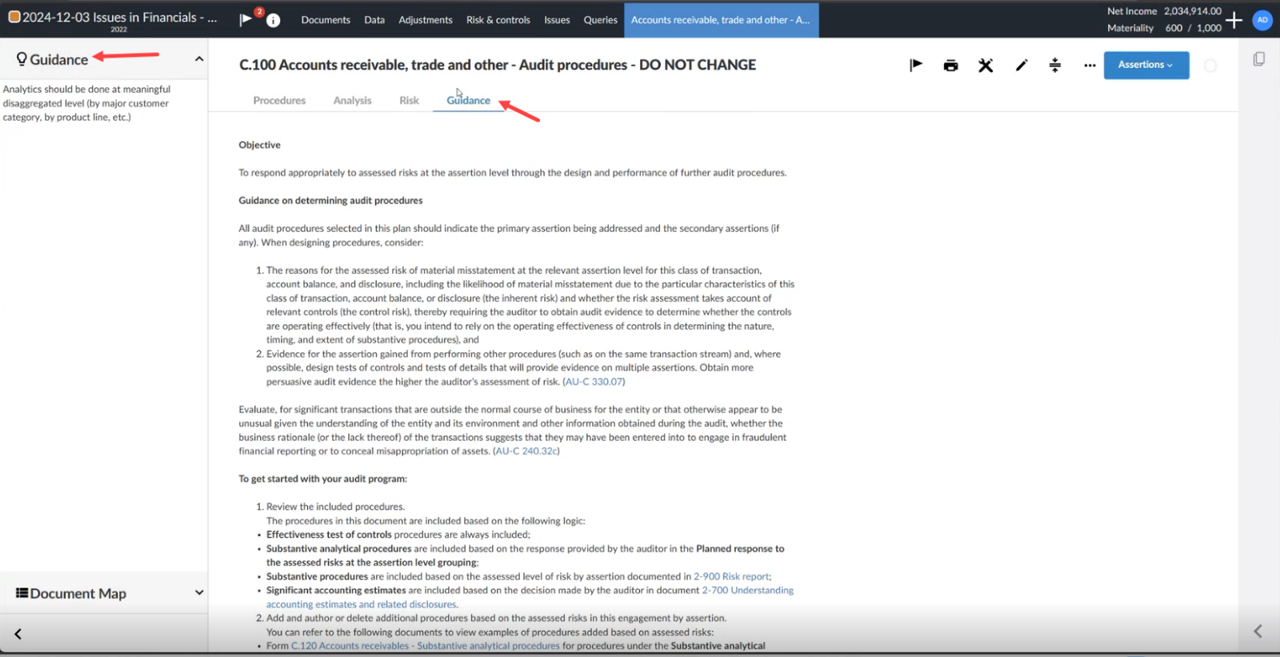
Within the Checklist Settings:
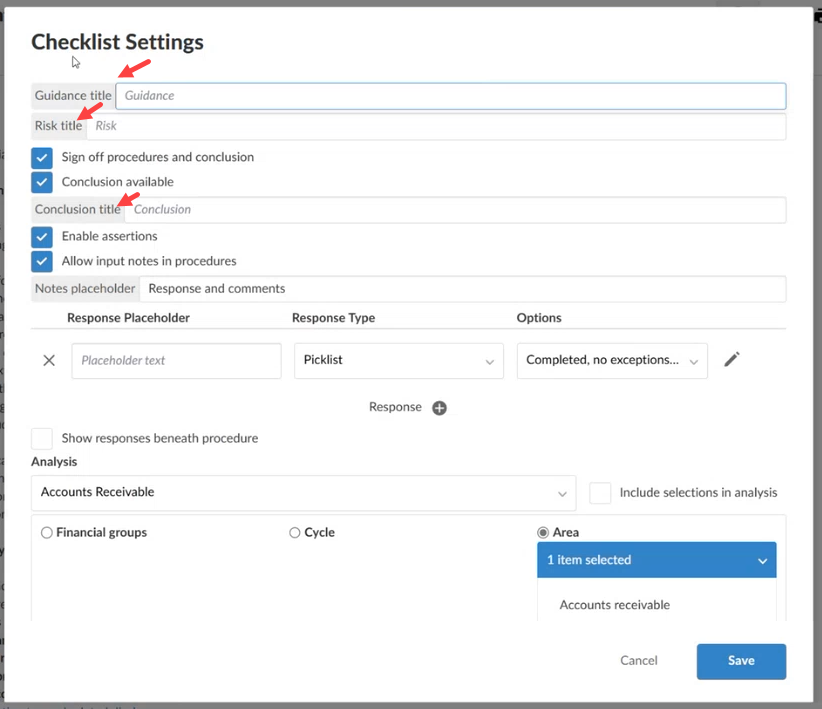
In addition, this feature extends to settings for procedures within the checklist.
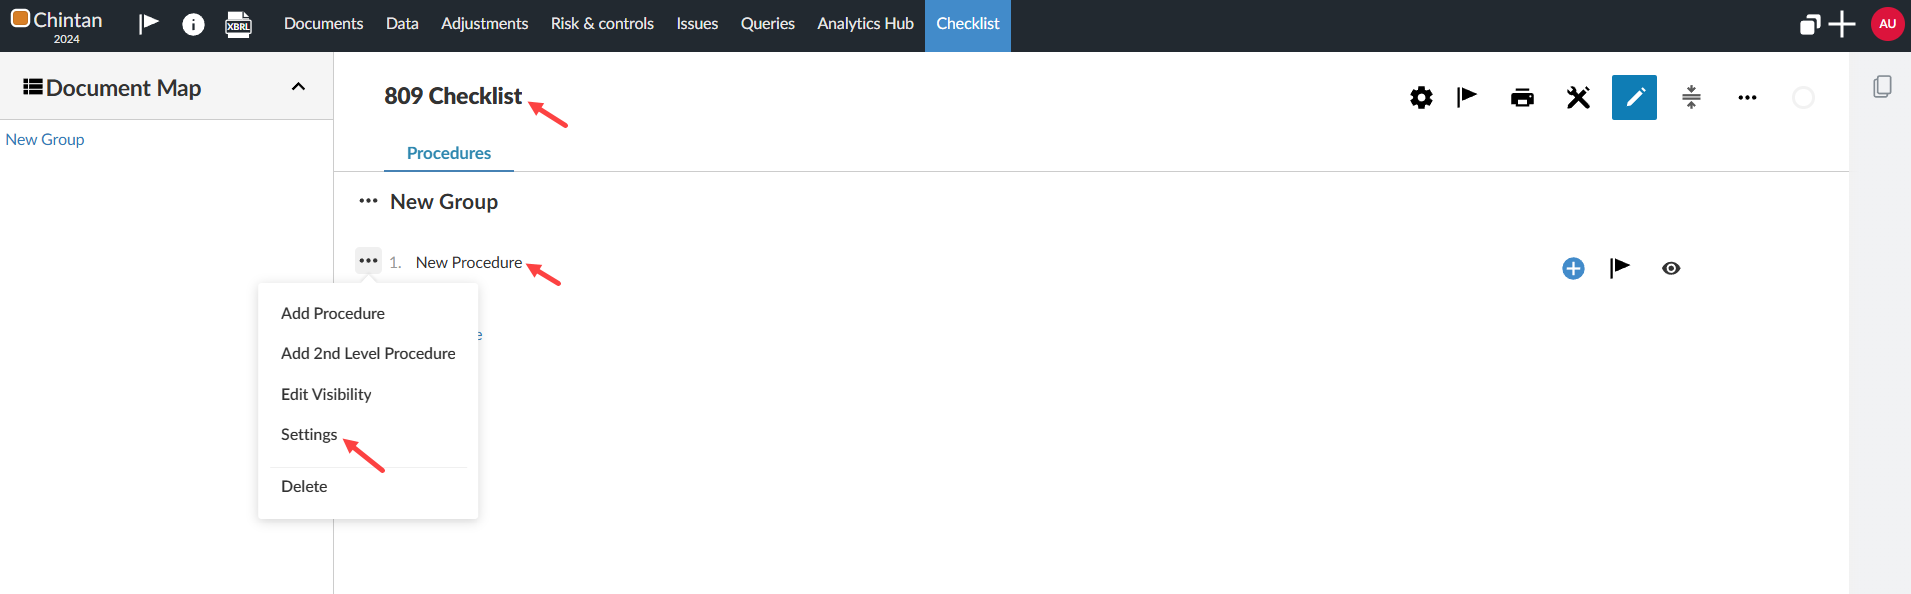
To add a language version of each procedure and query question (the French language is used as an example of this feature):
-
Open the checklist and select Edit [
]. For each procedure: -
Select the procedure description. The formatting toolbar displays.
-
Select Add Data Link [
 ] from the toolbar. The Data Link dialog opens.
-
At the Dynamic Text tab, add the French description of the procedure in the Output field.
-
Select Save.
-
If required, select the Summary field above the description to enter the French summary for the procedure.
To add the French query questions:
-
Open the query document. For each query question:
-
Select the description of the query question. The formatting toolbar displays.
-
Select Add Data Link [
] from the toolbar. The Data Link dialog opens. -
At the Dynamic Text tab, add the French description of the question in the Output field.
-
Select Save.
-
If required, select the Summary field above the text to enter the French summary for the query question.
You can add French response options for picklist or multi-picklist response types in the checklist default settings.
To add French picklist response options to the checklist default settings:
-
Select the Settings icon [
] to open the Checklist Settings dialog. -
Select the Edit icon [
]. -
Enter the French version of each picklist option.
-
Select Save.
You can also add French response types to individual checklist procedures and query questions that have a picklist or multi-picklist response type.
To add French picklist response options for a checklist procedure or a query question:
-
Go to the procedure in the checklist or the question in the query.
-
Select More actions [...] | Settings [
]. -
Select the Edit icon [
]. -
Enter the French version of each picklist option.
-
Select Save.
Financial statements
To provide content in another language, set the template's content language to your desired option. Then, update the text sections, headers, and footers by replacing the existing content with the new language version. The French language is used as an example of this feature.
Note: Trial balance groups automatically display in French once you switch the content language.
To add the French version of text sections in financial statements:
-
Navigate to the existing text section in the financial statements.
-
Remove the English language content and add the French version of the content.
To add French headers and footers in financial statements:
-
To add the document level header and footer, select the Settings icon [
] and choose Document Print Settings. -
Enter the header and footer content in the Header and Footer text fields.
You can also add custom French headers and footers for individual areas in the financial statements, the financial statement notes, and page breaks.
To add a custom French header or footer in an area or page break:
-
Go to the desired area.
-
Select the More actions (...) icon at the top right corner of the page.
-
Choose Edit Print Settings from the list of actions.
-
Select Custom header and Custom footer to display the text fields for the header or footer.
-
Enter the header and footer content in the text fields.
To add a custom French header or footer for the financial statement notes:
-
Select the Settings icon [
] and choose Notes Print Settings. -
Enter the header and footer content in the Header and Footer text fields.
For any other French version items, such as the titles of areas, in the financial statements, you need to either use dynamic text or add the French version of the content and then set them to only show if the selected content language of the template is French.
To author financial statements in French using dynamic text:
-
Go to the section you want to add French content to and select Add Data Link [
] from the toolbar. The Data Link dialog opens. -
At the Dynamic Text tab, add the French content in the Output field.
-
Select Save.
To author financial statements in French using visibility logic:
-
Add French content in the desired areas.
For each area:
-
Select Add [
 ] | Text section.
 -
Enter the French content.
-
Set up the visibility logic to have the content only display when the content language is French.
-
Add the French note disclosures:
For each note:
-
Go to the Document Map and select Add [
 ]| Create Note.
 -
Enter the French note.
-
Set up the visibility logic to have the note only display when the content language is French.
To set up the visibility logic for each French area and note:
-
Select More actions (...) | Edit Visibility.
-
Select Language from the Add Condition drop-down.
-
Set the Content language is parameter to French.
-
Change the condition logic from to Show.
Materiality form
As a firm or enterprise author, you have multilingual capabilities in editable fields in the Materiality form. You can select a default language for your engagements and have the additional flexibility to change the language within editable fields.
Editable fields that include multilingual capabilities include:
-
Document and Sections Guidance
-
Sections Titles
-
Tables Headings
-
Overall Materiality - Benchmarks Input fields in Tables (Custom formulas / Other)
-
Performance Materiality & Trivial - % description
-
Conclusion procedures (including conclusion for Group component allocation)
To switch languages in an engagement
-
Select the top-left corner of an engagement, to open the Entity dialog box.
-
Select the drop-down menu under Content Language.
-
Select the language you wish to use.
-
Open the Materiality form under the Documents page.
-
Edit or add content in the language that you selected in the editable fields.
-
Select the checkmark beside the field to save the content.
-
Repeat if you require the same content in other languages.
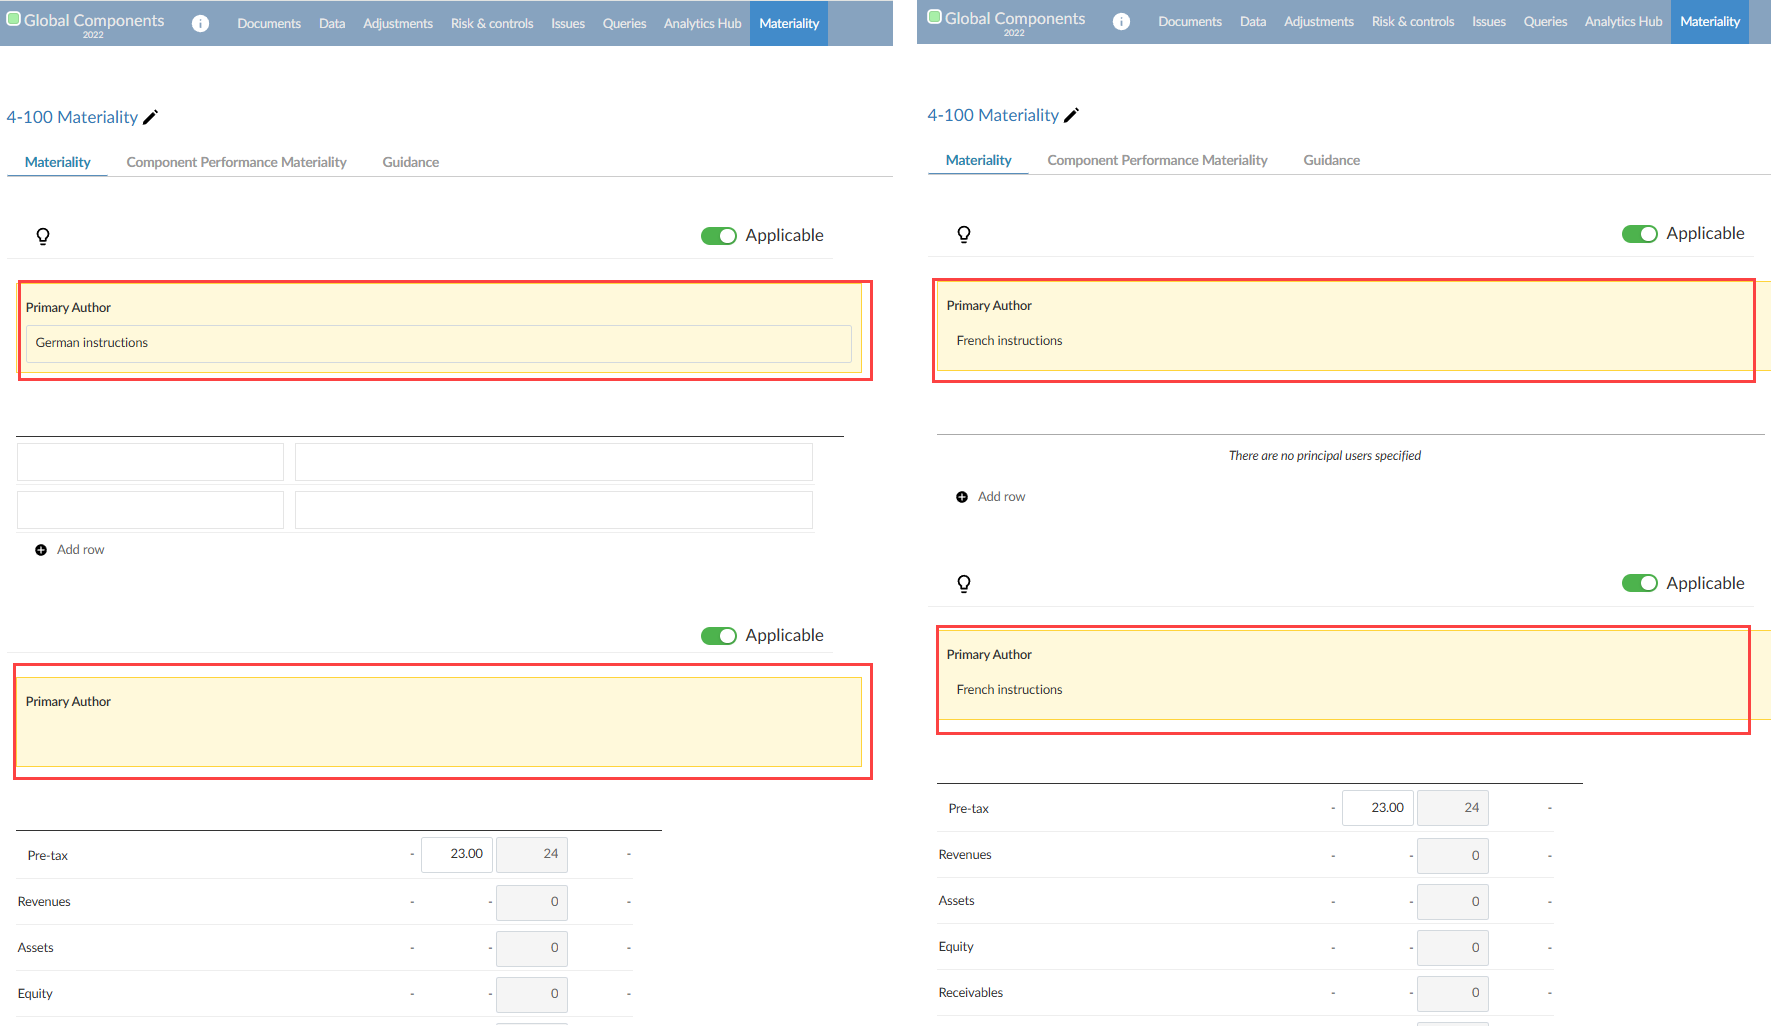
A mock example of French and German instructions
Summary of Misstatements
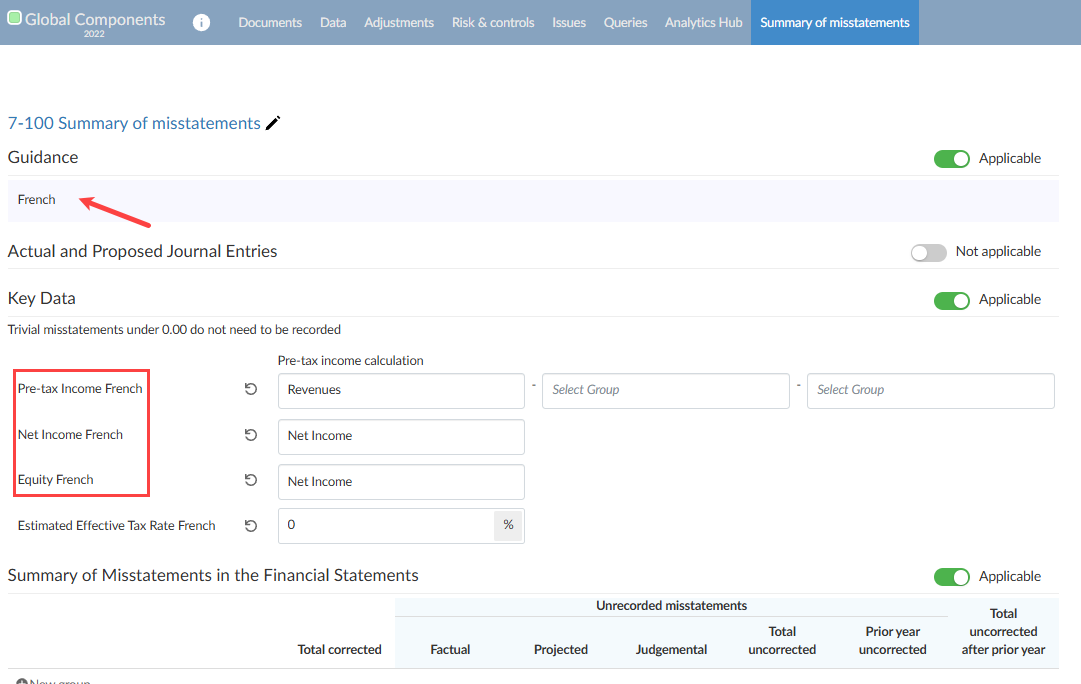
Similar to the Materiality form, authors can use multilingual capabilities in the Summary of misstatements document, specifically the Guidance and Key Data (input) fields.
A mock French example of the Summary of misstatements
Folders, subfolders, documents and placeholders
To rename folders, subfolders, documents and placeholders:
-
Go to the Documents page.
-
Rename each folder, subfolder, document and placeholder.
For each item:
-
Select More actions [...] | Edit [
]. -
Enter the French name and identifier of the folder or subfolder, document and placeholder.
Custom analytic tests
You can author custom analytic tests in multiple languages. When you copy a default analytic test, the system automatically creates versions for each language configured in Product settings | Content language.
To author custom analytics in multiple languages:
-
In the product template, select the Engagement name in the top left to make the Engagement properties dialog appear.
-
In Content language, select the language for which you are translating labels in the customized analytic test.
-
Go to Analytics Hub and select a default test.
-
Select the Copy icon (
 ) to create a custom version of the analytic test. Refer to Customize analytic tests for more information.
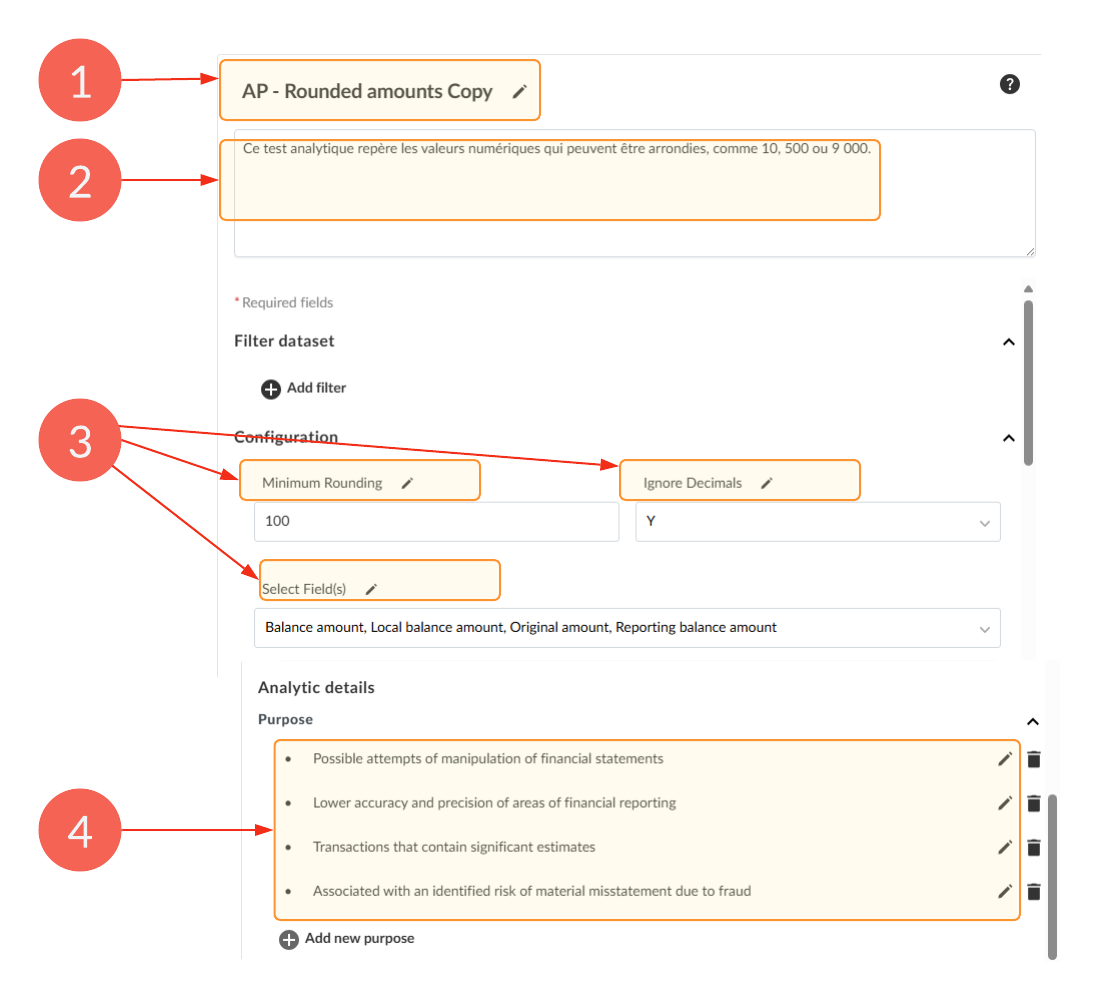
| Element | Description |
|---|---|
| 1 | Name of the analytic test |
| 2 | Description of the analytic test |
| 3 | Parameter names |
| 4 | Purpose |
-
Save changes per language. You can only edit one language at a time.
Note:
-
Default analytic tests provided by Caseware are pretranslated.
-
Translations for custom analytics are not automatic. You must provide the localized content.
-
If a translation is missing, the system displays the default language (typically English).
Risk Library
As an enterprise author, you can create and import Risk Library content in more than one language. You manage the additional languages through the Risk Library import Excel file, so a single library can serve firms that operate in more than one official language and networks that deploy content to member firms in different countries. Your users then work with Risk Library content in the language selected in their engagement.
You can provide additional-language content for the Risk Library fields that are defined in the import file. To learn more, see Manage the risk library.