Adding and Deleting Note Content
Financials enables you to add custom notes to the financial statement area library documents. You can also insert notes within existing notes or delete a note that you have created.
Adding notes is part of the process of creating content for a client file. This content is then packaged and made available to users.
Fundamental Topics
- Adding a note to an existing location in the Knowledge Library Index hierarchy
- Adding a note to a new location in the Knowledge Library Index hierarchy
- Inserting a note within an existing note
- Deleting a note
- Deleting multiple notes
- Deleting components of a note
- Recovering hidden paragraphs
Adding a Note to an Existing Location in the Knowledge Library Index Hierarchy
You can add a note from the Knowledge Library to an existing location in the Knowledge Library Index hierarchy.
Procedure
-
In one of the note libraries, from the Document menu, select Add New Firm Content. The New Content Specification dialog appears.
-
From the Area drop-down, select the area in which the new note is to be located.
-
From the Heading drop-down, select the heading for the new note.
-
From the Topic drop-down, select the topic for the new note.
-
If the Subtopic drop-down exists, select the subtopic for the new note. For details on how to specify whether subtopics are to be provided for notes, see General Settings.
- In the Name field, type the name of the new note.
- Click OK. The Knowledge Library dialog appears.
- In the bottom pane of the Knowledge Library dialog, click the Section Preview tab and then select the Preview Content check box. This enables you to preview any selected content.
- In the top pane of the Knowledge Library dialog, locate the content for your note and click its radio button. A preview of the selected content appears in the bottom pane of the dialog.
- Click OK.
Results
The note is added to the existing location.
Adding a note to a new location in the Knowledge Library Index hierarchy
You can add a new note to the Knowledge Library Index hierarchy.
Prerequisite
- In one of the note libraries, from the Document menu, select Add New Firm Content. The New Content Specification dialog appears.
- From the Area drop-down, click New Area, type the new area for the note, and click OK.
- From the Heading drop-down, click New Heading, type the new heading for the note, and click OK.
- From the Topic drop-down, click New Topic, type the new topic for the note, and click OK.
- If the Subtopic drop-down exists, click New Subtopic, type the new subtopic for the note, and click OK. For details on how to specify whether subtopics are to be provided for notes, see General Settings.
- In the Name field, type the name of the new note.
- Click OK. The Knowledge Library dialog appears.
- In the bottom pane of the Knowledge Library dialog, click the Section Preview tab and then select the Preview Content check box. This enables you to preview any selected content.
- In the top pane of the Knowledge Library dialog, locate the content for your note and click its radio button. A preview of the selected content appears in the bottom pane of the dialog.
- Click OK.
Results
The note is added to the existing location.
The best practice is to use the existing areas and headings. Using these categories ensures the notes are placed in the correct order in the financial statements and users will not have to sort the notes after insertion.
Inserting a Note within an Existing Note
Financials provides the ability to add notes within notes so that you can take text or tables from any existing note and add it to the note under construction. This enables you to construct notes consisting of multiple sections or components.
- In one of the note libraries, right-click the (lowest-level) heading for the existing note in which you want to insert a new note.
- From the shortcut menu that appears, select Knowledge Library and Insert Note Within [heading], where [heading] is the heading for the note. The Knowledge Library dialog appears.
- In the bottom pane of the Knowledge Library dialog, click the Section Preview tab and then select the Preview Content check box. This enables you to preview any selected content.
- In the top pane of the Knowledge Library dialog, locate the content for your note and click its radio button. A preview of the selected content appears in the bottom pane of the dialog.
- Click OK.
The new note is inserted into the existing note.
Deleting a Note
You can delete any note that you have added to the financial statements.
Procedure
- In one of the note libraries, right-click the (lowest level) heading of the note to be deleted.
- From the shortcut menu that appears. select Configure and Delete Note - [heading], where [heading] is the heading for your note.
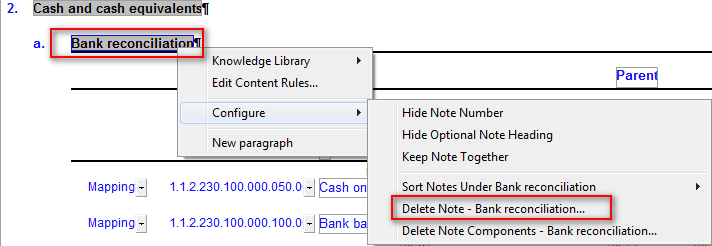
- When you are asked to confirm whether you want to delete all content in this note, click Yes.
Results
The note is deleted.
Deleting Multiple Notes
You can use the Knowledge Library dialog to delete multiple notes.
Prerequisite
- In one of the note libraries, from the Document menu, select Delete existing firm content. The Knowledge Library dialog appears.
- Select the notes to delete.
- Click OK to delete the selected notes.
Procedure
The notes are deleted.
Deleting Components of a Note
You can delete a component of a note that contains multiple components.
Prerequisite
- In one of the note libraries, right-click the (lowest level) heading of the note whose component is to be deleted.
- From the shortcut menu that appears. select Configure and Delete Note Components - [heading], where [heading] is the heading for your note.
- From the dialog that appears, select the check boxes next to the components that you want to delete.
- Click OK.
Procedure
The note components are deleted.
Recovering Hidden Paragraphs
While authoring in the library, you may set skip/hide conditions on paragraphs that are dependent on settings in the financial statements to display. You can view these hidden paragraphs using the option to recover hidden paragraphs.
Procedure
- From the Format tab, in the Refresh group, click Hidden Paragraphs.
Results
The hidden paragraph will display in blue.